Permanent Makeup Portfolio Tips for Beginners
Building a strong portfolio is one of the fastest ways to attract clients and grow your career in Permanent Makeup in the United States. Whether you’re just finishing an accredited training or looking to refine how you show your work, these Permanent Makeup Portfolio Tips for Beginners will help you present your skills professionally.
In this comprehensive guide from Skinart United States, Gary Erskine (Lead Tutor, 25+ years in the industry) walks you through practical, studio-ready steps to create a portfolio that wins trust, demonstrates clinical competence, and converts leads into bookings. We’ll cover photography, organization, client consent, ethics, and how to site your portfolio online and in-person.
Every tip below is tuned for beginners — clear, actionable, and compliant with US standards. If you want structured learning and accredited certification to reinforce these skills, our Online Permanent Makeup course is available for US students at /us/course/online-pmu-course/.
- Why a Portfolio Matters
- Photography & Setup: First Impressions
- Client Consent, Before & After — Pros and Cons
- How to Structure and Tag Portfolio Entries
- Common Portfolio Mistakes to Avoid
- Presenting Your Work Online (Website & Social)
- Legal, Safety & Ethics for US Artists
- FAQ — Permanent Makeup Portfolio Tips for Beginners
- Final Thoughts & Next Steps
Use the anchor-linked headings above — Google may show “Jump to” links in search results when you use semantic IDs.
Why a Portfolio Matters for Beginner PMU Artists
For a beginner in Permanent Makeup, your portfolio is your most important marketing tool. It communicates technical skill, aesthetic judgment, sanitation standards, and the kind of client experience you deliver. The phrase “Permanent Makeup Portfolio Tips for Beginners” captures more than a how-to; it describes how you build credibility and convert inquiries into bookings.
Think of your portfolio as a living CV. It’s not just a collection of pretty images — it’s evidence that you understand consultation, color selection, and client aftercare. Prospective clients and referring professionals expect clear before-and-after documentation and robust notes about the procedure, pigments, and healing.
Start with honesty. For beginners, identify which treatments are entry-level (microblading, soft ombré brows) and which require more advanced training (lip and areola reconstruction). Use your portfolio to track progression and be transparent about the stage of your development — clients appreciate clarity.
Client Consent, Before & After — Pros and Cons
Before-and-after photos are the backbone of any Permanent Makeup portfolio, but they come with responsibilities. Proper client consent and documentation protect both the artist and the client — and make your portfolio trustworthy.
- Pros: Demonstrates results, shows healing, builds client trust.
- Cons: Requires strict consent procedures and clear privacy handling.
Always use a written consent form that gives permission to photograph, publish, and edit images for marketing. Keep a clear log of the treatment, pigment names, machine/needle settings, and pre/post-care instructions with each set of photos. This level of detail not only improves your portfolio but also helps in case of disputes or if you need to refer back to a technical parameter later.
In the United States, privacy expectations vary by state. While most clients are happy to have their photos used, always honour requests to remain anonymous and use cropped or blurred faces where needed. Maintaining ethical standards will support your reputation long-term.
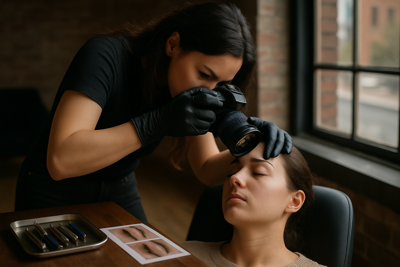
Photography & Setup: First Impressions Count
Good photography turns competent work into a compelling booking driver. You don’t need a professional studio to get consistent results, but you do need reliable lighting, a neutral backdrop, and a repeatable setup. The keyword — Permanent Makeup Portfolio Tips for Beginners — applies strongly here: start simple, focus on consistency, and let the results speak for themselves.
Use a plain, non-reflective background and position the client so the face is centered and level in every shot. Take photos from three standard angles: head-on, three-quarter, and profile (where appropriate). For brows, close-ups at the treatment zone and a wider shot including the face are both useful.
Lighting is everything. Natural, diffused daylight is ideal. If you rely on artificial light, use two softbox lights or a ring light to remove harsh shadows. Avoid using the phone flash; it flattens texture and changes pigment appearance. If you edit color or exposure, make subtle adjustments only and keep originals archived to maintain transparency.
- Standardize distance and angle for each type of treatment.
- Always label files: YYYYMMDD-client-initials-treatment-angle (e.g., 20250910-JS-brows-front).
- Include a neutral color reference (white card) in at least one photo to correct color in post-processing.
- Photograph immediately post-treatment and then at key healing stages (7–14 days, 6 weeks).
- Keep a secure, backed-up archive of original images and consent forms.
- Use secure cloud storage compliant with privacy expectations in the U.S.
- Capture process shots that show hygiene, gloving, and setup to reassure clients.
- Maintain consistent editing and export settings so galleries look cohesive.
Common Portfolio Mistakes Beginners Make
- Inconsistent lighting and angles, making comparison impossible.
- Poor photo quality (blurry, reflective, overexposed).
- Lack of consent documentation or unclear release forms.
- Showing only perfect cases — not demonstrating healing or touch-ups.
- Over-editing images to misrepresent pigment results.
- Unclear or missing procedure notes (pigment, needles, settings).
- Not labelling or organizing files — hard to find examples for consultations.
- Failing to show clinical hygiene (gloved hands, clean station), which can deter cautious clients.
Avoiding these pitfalls is the quickest way to improve the perceived quality of your work. For instance, small investments in a simple light setup and a background will fix a majority of common photo problems.
Another frequent issue is the omission of healing shots. Clients want to know what to expect. By showing initial results, typical crusting, and healed results at 6–8 weeks, you demonstrate realistic outcomes and improve client trust.
How to Structure and Tag Each Portfolio Entry
Organizing your portfolio makes it usable. For consultations, you want to find relevant examples in seconds. Build a consistent structure for each entry and use tags liberally so you can filter by service, skin type, and healing stage.
A suggested data template for every portfolio entry includes: date, client initials, treatment type, pigments used, needle configuration, machine/settings, immediate result, healed photos, and brief notes on complications or touch-ups. This level of detail is invaluable when you are beginning and will also impress referral partners who ask for evidence of clinical competence.
- Date of treatment and client initials (protect full name).
- Treatment category (e.g., microblading, ombré brows, lip blush).
- Skin type (Fitzpatrick scale if you use it) and relevant client notes.
- Pigment brand and shade, needle/needle grouping, machine model.
- Photos: pre, pre-drawn mapping, immediate post, 7–14 day, and 6–8 week healed.
- Consent status and signed release file reference.
- Aftercare provided and any recommended follow-up (retouch date).
- Tag entries with service, skin tone, and issue solved (e.g., sparse brows, asymmetry).
- Attach client feedback or testimonial where possible.
Presenting Your Work Online: Website, Social & Reviews
Today, clients often find artists through Instagram and Google searches. Your online portfolio should be an extension of your in-practice presentation — clear, honest, and easy to navigate. Use high-quality galleries, well-labeled collections, and brief captions that include the treatment, healing stage, and a note about the client’s skin type.
Engage with prospective clients by combining image-based posts with educational captions that explain what to expect through healing and how you approach shaping and color selection. Include short videos where possible — simple clips of consultation mapping or healed results can be persuasive.
Collect and display reviews. Verified client testimonials on Google or your website increase conversion. If a client prefers anonymity, post a cropped image or a text-only testimonial with the client’s consent. Remember, we do not supply PMU equipment in the United States, so when advising clients about home care, stick to general, non-proprietary aftercare advice and refer to product manufacturers or your training if applicable.
- Use categories on your website for Brows, Lips, Eyeliner, and Corrective work.
- Create a “Healing Timeline” page with representative case studies.
- Maintain an Instagram highlights section for healed results and FAQs.
- Link your portfolio to your booking system and intake forms to streamline conversions.
- Use geo-targeted keywords (e.g., “Permanent Makeup Portfolio Tips for Beginners — United States”) to improve local search performance.
- Periodically archive older cases that no longer represent your current skill level; keep a private archive for reference.
- Show before/after sliders where possible for immediate visual comparison.
Legal, Safety & Ethics — What US Beginners Must Know
Clients select artists who demonstrate safe practice. Even as a beginner, documenting your hygiene steps in your portfolio (gloves, single-use needles, proper disposal) reassures clients and referral clinics. Accurate notes on contraindications and the consent process are evidence of professionalism.
Stay informed about local regulations; licensing and standards vary by state. Basic bloodborne pathogen (BBP) training is recommended — in the United States many facilities expect BBP or equivalent certification. For technical guidelines on infection control, refer to the Centers for Disease Control and Prevention: https://www.cdc.gov.
Skinart United States courses are fully accredited through recognized industry bodies, and we emphasise documentation in line with CPD and BAQA expectations. As Gary often says in class: “A clear portfolio is not only a sales tool — it’s a safety and quality record.”
FAQ — Permanent Makeup Portfolio Tips for Beginners
Below are frequently asked questions we get from students and new artists. Each answer is short and practical.
How do I start a permanent makeup portfolio as a beginner?
Start by documenting each practice case and client case with a consistent setup and a simple spreadsheet or portfolio system. Keep consent forms and treatment notes with each entry.
What photos are essential in a PMU portfolio?
Always include pre-treatment, immediate post, and healed (6–8 weeks) images. Where relevant, include mapping, close-ups, and process shots showing hygiene and setup.
How many portfolio cases should a beginner show?
Ten strong cases per service category is a practical starting point; as you grow, refine the selection to show your best and most representative outcomes.
Should I edit my images for Instagram?
Edit only for exposure and color correction using a neutral reference; avoid heavy retouching that misrepresents the results. Transparency builds client trust.
How do I protect client privacy?
Use written consent, anonymize files if requested, and store personally identifying information separately and securely per applicable privacy norms in the United States.
Final Thoughts — Take Control of Your Portfolio and Career
Building a portfolio is a process, not a single task. As you complete your accredited training and gain experience, use the Permanent Makeup Portfolio Tips for Beginners above to create a system that highlights your strengths and documents your growth. Consistency, honesty, and good documentation will set you apart in the United States market.
If you’d like structured guidance that covers portfolio best practices alongside clinical skills, consider the Skinart online PMU course. Our syllabus emphasises documentation, safe practice, and client communication — all elements that make an excellent portfolio.
Written by Gary Erskine, Lead Tutor — 25+ years in Permanent Makeup education. Skinart United States provides accredited online courses with CPD Standards recognition and BAQA alignment. Reach out to our team to discuss course options and how to integrate portfolio-building into your learning path.