Healing Timeline: What Happens After Microblading?
Undergoing microblading is an exciting step toward fuller, natural-looking brows — but the result you see on day one will evolve over the following weeks. This guide explains the Healing Timeline After Microblading in practical detail so you know what to expect at every stage, how to care for your new brows, and when to contact a professional if issues arise.
Whether you’re a client preparing for your first appointment, a new artist wanting to counsel clients more confidently, or a US-based professional checking best practices, understanding the healing timeline helps everyone make safer, better decisions. We’ll walk through immediate aftercare, the scabbing and pigment-settling phases, retouch windows, and long-term care strategies tailored to clients in the United States.
Written by Gary Erskine, 25 years in Healing Timeline After Microblading education. Gary is lead tutor at Skinart United States and has trained thousands of students worldwide — bringing practical, accredited advice that aligns with CPD and BAQA guidance.
Table of Contents
Use these links to jump to a section — ideal for quick answers and SERP “jump-to” results.
- Overview: Healing Timeline After Microblading
- Immediate Care: 0–48 Hours
- First Week: Scabbing & Peeling
- Weeks 2–4: Pigment Stabilisation — Pros & Cons
- Weeks 4–8: Retouch & Long-term Care
- Common Mistakes & Issues to Avoid
- Care Tips for Best Outcomes
- Local US Examples & Success Stories
- FAQs: Healing Timeline After Microblading
- Final Thoughts & Next Steps
Overview: Healing Timeline After Microblading
Microblading is a controlled abrasion of the superficial skin layers combined with pigment implantation. Right after the session, the brows may look darker and more intense than the final result. Over the following 4–8 weeks, the skin regenerates and the pigment settles into the dermal layers — this progression is known as the Healing Timeline After Microblading.
Why does this matter? Knowing the typical stages helps clients keep realistic expectations and follow aftercare directions to protect pigment retention and reduce risk of complications. For artists, understanding the timeline is essential for pre-procedure consultations and scheduling retouches.
The timeline can vary by individual factors including skin type (oily vs dry), lifestyle, medication, and how closely aftercare is followed. In the United States we often see seasonal differences too — hot, humid summers can accelerate scabbing and fading, while winter skin may take longer to flake and stabilise.
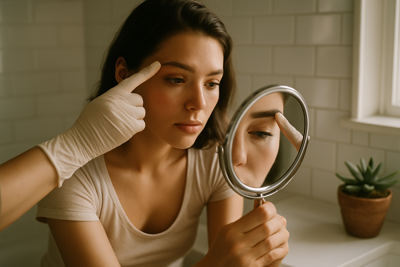
Immediate Care: 0–48 Hours
The first two days after microblading are critical. The skin is effectively an open wound where pigment has been placed. This phase determines much of the immediate appearance and sets the tone for how well pigment will be retained through the healing process.
- Keep the area dry for the first 24 hours unless your artist has advised a specific wipe protocol.
- Avoid touching, rubbing, or pressing the treated area.
- Expect mild redness, tenderness, and fluid weeping — this is normal inflammation as the body begins the repair process.
Aftercare directions vary by artist, but commonly include gentle cleansing with a sterile saline solution or a recommended mild cleanser, followed by a thin layer of aftercare balm where advised. In the United States, many clinics recommend avoiding makeup and heavy sweating for at least 48 hours to minimise infection risk.
Contact your artist immediately if you notice heavy bleeding, significant swelling, severe pain, or signs of infection such as spreading redness or unusual discharge. If you’re unsure, seek medical advice — your safety comes first.
First Week: Scabbing and Peeling
Between days 3 and 7 most clients enter the scabbing and peeling stage. Tiny crusts form as the skin repairs itself. While seeing flakes and small scabs might be alarming, this is a normal part of the Healing Timeline After Microblading and indicates the skin is closing over the pigment.
Resist the urge to pick or peel scabs — removing them prematurely can pull pigment out and cause patchy results or scarring. Gently moisturise only as your artist has instructed and avoid aggressive exfoliation during this phase.
During the first week, expect visible changes:
- Brows often look darker initially and may appear uneven as scabs form.
- Some pigment will shed with the scabs — this is normal and part of the settling process.
- Color may look blotchy while healing; final smoothing happens later.
- Do not expose the area to swimming pools, hot tubs, or chlorinated water.
- Avoid saunas, steam rooms, and facial treatments.
- Sleep on a clean pillowcase to avoid contamination and friction.
- Wear loose clothing when sweating to stop sweat from irritating the brows.
- Protect the area from direct sun exposure — UV light can alter pigment during healing.
Weeks 2–4: Pigment Stabilisation — Pros & Cons
By weeks two to four the scabs have typically fallen away and the pigment begins to stabilise beneath the skin. The brows often look softer and less intense than day one. This is the phase when the real look of the work becomes apparent, albeit not yet final.
- Pro: Color softens and starts to blend naturally with hair — clients often report feeling relieved when the initial darkness diminishes.
- Con: Some pigment may have faded unevenly; this is why a scheduled retouch is commonly required.
- Pro: Many clients can resume more of their normal routine, with caution around sun exposure and exfoliation.
- Con: If aftercare wasn’t followed, pigment loss or uneven healing can be more pronounced.
- Pro: For many, brows look close to final by the end of week four.
- Con: Certain medical conditions or medications (e.g., strong retinoids, blood thinners) can slow stabilisation or cause extra fading.
Artists typically book a retouch around 6–8 weeks after the initial procedure. This allows the skin time to fully regenerate and the artist to assess areas that need densifying or correction. In the United States, scheduling a retouch within the recommended window is a standard part of professional client care.
Remember: the Healing Timeline After Microblading is not strictly linear for everyone. Clients with very oily skin or certain immune responses may notice an extended settling period or a need for additional colour boost sessions.
Common Mistakes & Issues to Avoid
- Picking scabs or scratching the treated area.
- Applying heavy makeup too soon which can trap bacteria.
- Failing to follow artist aftercare instructions.
- Using abrasive skincare (retinoids, acids) close to the treatment area without artist approval.
- Swimming in pools or open water early in the healing timeline.
- Excessive sun exposure that causes premature fading.
- Booking retouch appointments too early before skin stabilises.
- Not disclosing medications or medical conditions to the artist prior to treatment.
- Trusting unaccredited training sources — this affects artist skill and client outcomes.
These mistakes are avoidable with clear communication between client and artist. At Skinart United States we emphasise accredited training, so our graduates are taught to screen clients properly and provide structured aftercare instructions that reflect evidence-based guidelines.
If an issue arises — for example, unusual swelling or signs of infection — contact your treating artist immediately and seek local medical care if symptoms worsen. In the US, prompt action helps ensure there are no long-term consequences.
Care Tips for Best Outcomes
Good aftercare significantly improves pigment retention and reduces risk of complications. Below are tested recommendations that Skinart United States teaches in our accredited Microblading course.
- Follow artist-provided cleansing routine; usually a gentle saline or mild non-fragranced cleanser.
- Use thin layers of recommended aftercare balm only when instructed.
- Avoid direct water pressure on the brows while showering in the first week.
- Skip facials, chemical peels, and laser treatments in the eyebrow area until fully healed.
- Avoid heavy workouts that result in dripping sweat during the first 7–10 days.
- Limit UV exposure and always use protective measures after healing (SPF on healed skin).
- Be patient — final results often need a 6–8 week retouch window.
- Keep communication open with your artist — they’re the best first point of contact for specific concerns.
For artists: document aftercare instructions in writing and review them verbally before clients leave the studio. In the United States, clear documentation also helps protect both the practitioner and client by setting expectations.
Weeks 4–8: Retouch and Long-term Care
The standard practice for most professional studios in the United States is to schedule a retouch between 6 and 8 weeks after the initial microblading session. This appointment allows the artist to top up pigment, even out any loss, and make shape adjustments now that the skin has fully healed.
Long-term maintenance varies by individual and lifestyle. Clients who are outdoors frequently, use exfoliating skincare, or have oily skin may need booster sessions every 12–18 months. For many, a single retouch achieves the desired clarity for a year or longer.
“Accredited training and careful aftercare are the cornerstones of safe, lasting microblading results,” says a CPD Standards spokesperson. “Clients should seek practitioners who follow standardised healing protocols.”
Keeping a record of the pigments used, techniques applied, and photos throughout the healing timeline helps with retouch planning. At Skinart United States our students learn how to document every treatment to support predictable outcomes and client safety.
Local US Examples & Success Stories
Across the United States, clients who follow aftercare guidance report higher satisfaction with their healed results. For example, an Iowa client we trained reported that adhering to a no-sweat week helped her retain clean strokes and minimal touch-up needs at her 8-week appointment.
In New York City, experienced Skinart graduates who emphasise consultation and written aftercare tend to reduce unnecessary retouches and build stronger client relationships. These stories reflect how education, clear communication, and follow-through produce better Healing Timeline After Microblading outcomes.
- A Portland client avoided pool visits for six weeks and retained excellent pigment depth.
- A Texas client on blood-thinning medication coordinated with her physician and artist, leading to safe, well-healed results after medically supervised planning.
- A California client noticed slower scab shedding during winter but achieved excellent final shape after the scheduled retouch.
These examples show how local lifestyle, climate, and pre-existing medical factors influence the timeline. When in doubt, consult a qualified artist or medical professional in your area.
FAQs: Healing Timeline After Microblading
Below are frequently asked questions phrased as readers commonly search. Each answer is brief and practical.
How long does it take to heal after microblading?
Most people complete the visible healing within 4 weeks, but full pigment stabilisation and the recommended retouch occur around 6–8 weeks depending on individual factors.
Will my microblading look great immediately after the session?
Brows usually look darker and fuller immediately after treatment; colour softens as the skin heals. Expect differences between day one and the final healed result.
Can I swim during the healing timeline after microblading?
Avoid pools, hot tubs, and open water during the initial healing period (at least 7–14 days) because chlorine and bacteria can increase infection risk and pigment loss.
What happens if scabs are picked?
Picking scabs can remove pigment and increase the risk of scarring; this often results in patchy healed results requiring additional correction at retouch.
Do I need a retouch after microblading?
Yes — a retouch 6–8 weeks after the initial session is standard to perfect the shape and colour after the skin has fully healed.
Final Thoughts & Next Steps
Understanding the Healing Timeline After Microblading equips you to make informed choices and helps ensure beautiful, long-lasting results. This process is a partnership between client and artist — education, accreditation, and clear aftercare all play a role.
At Skinart United States we teach accredited Microblading courses that cover healing timelines, complications management, and professional aftercare communication. Our graduates are prepared to counsel clients clearly and create outcomes that meet expectations.
If you’re ready to learn more about microblading from an accredited provider and want to master how to manage the entire healing timeline for clients in the United States, take the next step with our online Microblading course.
Recent Blog Posts
- Studio Etiquette Update: Professionalism in 2026
 Workplace Etiquette for Body Art Studios Refresh your studio etiquette and build a reputation for professionalism with these up-to-date best practices.… Read More »Studio Etiquette Update: Professionalism in 2026
 - 🌙 Eid Mubarak: Celebrate with 5% Off in 2026!
 Eid Savings: 5% Off All Courses Celebrate Eid with a special offer: 5% off any course. Use code EID5 at checkout.… Read More »🌙 Eid Mubarak: Celebrate with 5% Off in 2026!
 - Top Mistakes New Body Artists Should Avoid (2026)
 Stay Ahead: Common Pitfalls for New Artists Read up on the most frequent errors new body artists make, and how to… Read More »Top Mistakes New Body Artists Should Avoid (2026)