Tools and Pigments Needed to Start Microblading
Starting a microblading career in the United States begins with understanding what tools and pigments you need to start microblading, how they work together, and why selecting the right kit is crucial for client safety and great results. Whether you’re an experienced beauty professional expanding your services or a newcomer eager to learn, this guide walks you through the essential equipment and pigment choices that set up a strong foundation.
At Skinart United States we focus on accredited training, sound technique and industry-standard safety. This article explains the practical tools, trusted pigment chemistry, and setup considerations to help you make informed purchases and prepare for professional microblading practice.
Written by Gary Erskine, 25 years in microblading education — this resource reflects real classroom experience, industry standards and feedback from thousands of students trained worldwide.
Table of Contents
- Overview: Tools and Pigments Needed to Start Microblading
- Pros & Cons of Popular Tools and Pigments
- Essential Tools and Pigments (Checklist)
- Common Mistakes to Avoid
- Choosing Pigments: How to Match Skin Tones
- Safety, Hygiene & Sanitation
- Setting Up Your Microblading Station (Supplies & Costs)
- Frequently Asked Questions
- Final Thoughts & Next Steps
Use these anchor links to jump to the section you need. Proper headings and IDs help Google show “Jump to” links in search results.
Overview: What “Tools and Pigments Needed to Start Microblading” Really Means
When we talk about the tools and pigments needed to start microblading, we’re describing an ecosystem — precise hand tools, measured pigments and disposables, combined with sanitation, color theory and technique. The right tools help you create crisp, natural hair-strokes and control pigment deposit; the right pigments allow predictable healed color and good retention across a range of skin types.
Microblading differs from other semi-permanent makeup techniques because it relies on manual blades to place strokes superficially in the upper dermis. That means your tools are simple but exacting: blades (in cartridges or U-shaped microblading needles), high-quality pigments formulated for microblading, shading pigments where needed, and a consistent set of disposables and aftercare materials.
Beginning in the United States, technicians must pair clinical safety practices with pigment knowledge. This section grounds the discussion so the rest of the article — from shopping lists to common mistakes — makes practical sense for your first professional kit.
Pros & Cons of Popular Tools and Pigments
Understanding the trade-offs between tools and pigment types will save you money and reduce learning time. Below is a short analysis that helps you decide what to invest in first.
- Manual blades (microblades): Precise strokes and control; steeper learning curve and slower for full brows.
- Cartridge-style manual or manual-hybrid handles: Quicker to change, hygienic single-use options; can be slightly more expensive per client.
- Machine (PMU device) microblading cartridges: Faster, easier for layered shading; some prefer machine shading for longevity, but it requires different technique and training.
- Iron-oxide pigments: Excellent stability and predictable fades; some cool tones are harder to achieve purely with iron-oxide driven ranges.
- Organic iron-free pigments: Softer fades in some skin tones but can be less stable over time; choose reputable manufacturers.
Pros: Selecting quality tools and stable pigments improves your consistency, reduces touch-ups, and protects your reputation. For students in the United States, investing in accredited training like Skinart United States ensures you learn which pigments their suppliers trust and how pigmentation behaves across Fitzpatrick skin types common in U.S. populations.
Cons: Early purchases can be costly. Low-cost pigments or unregulated tools can lead to poor retention, allergic reactions, or uneven healing. Skinart does not supply microblading equipment in the United States, so students should budget for their own kit purchases after learning how to evaluate products.
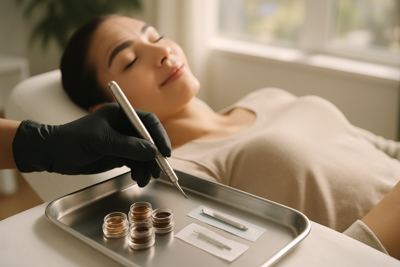
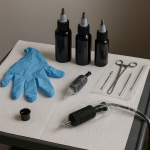
Essential Tools and Pigments (Complete Checklist)
Below is a practical equipment and pigment checklist you can use when assembling your first professional microblading kit. The items are ordered roughly from highest priority to optional but recommended.
This section directly answers the question: tools and pigments needed to start microblading — and it includes the items most often requested by Skinart students in the United States.
- Microblading blades or U-shaped needles (single-use, sterile) — multiple sizes for hair stroke variation
- Manual microblade handle or disposable cartridge handle (ergonomic, sterilizable where applicable)
- High-quality microblading pigments: at least 4–6 base shades (light, medium, dark neutrals and warm/cool modifiers)
- Measuring calipers or brow ruler and flexible measuring tape for precise mapping
- Disposable micro-pore tape, sterile gauze, and alcohol swabs (70% IPA) for prepping and assisting
- Numbing creams (topical anesthetic) and protocols — ensure you are trained on safe use
- Gloves (nitrile), barrier film, and single-use aprons to maintain a clean field
- Disposable pigment rings or palette cups and sterile applicators
- Aftercare materials and client instructions cards — essential for proper healing outcomes
- Sharps containers, biohazard bags and waste disposal plan compliant with local U.S. regulations
- Magnification lamp or head loupe and good daylight-simulating lighting
- Practice skins and simulated inks for training at home (do not practice on clients until certified)
- Hand sanitizer, surface disinfectant, and single-use windshield (barrier film) for machines and pens
Tip: Buy reputable pigments with transparent ingredient lists and batch testing. The U.S. market sees many brands — choose those with FDA-compliant labeling where possible, and prioritize pigments manufactured specifically for PMU or microblading rather than tattoo inks made for deep tattoos.
Remember: Skinart United States does not supply microblading equipment locally. We teach you how to choose, evaluate, and safely use tools and pigments so you can buy the right items from regulated U.S. or trustworthy international suppliers.
Common Mistakes When Choosing Tools and Pigments
- Buying the cheapest pigment without checking ingredients or stability testing
- Using tattoo pigments or body art inks not formulated for microblading
- Mixing pigments without documented protocols (leads to unpredictable heals)
- Reusing single-use blades or cartridges (risk of cross-contamination)
- Poor lighting when color-matching — clients leave with unsuitable shades
- Neglecting to account for undertones — choosing purely warm or cool shades without modifiers
- Inadequate skin prep or incorrect numbing protocol causing uneven pigment uptake
- Not having proper disposal and sharps containers — legal and safety hazard
- Failing to perform patch testing for sensitive clients or those with a history of allergic reactions
- Improper storage of pigments (exposure to heat and light reduces stability)
Many issues stem from poor product selection or incomplete training. For example, pigments formulated for deeper tattooing often contain carriers and dyes that behave very differently when placed superficially by microblading. This can result in color shifting or early fading — exactly the problem proper pigment education avoids.
Skinart United States emphasises training on product selection and post-procedure healing behavior so you can reduce client touch-ups and establish a trustworthy reputation from day one.
Choosing Pigments: Practical Guidance for Skin Tones and Retention
Choosing the right pigment set is one of the most important decisions you’ll make when assembling the tools and pigments needed to start microblading. Pigments designed for PMU are formulated for superficial placement and for predictable lightening over time — which is what you want for natural-looking brows.
When color-matching, consider the client’s natural hair color, skin undertone, and Fitzpatrick classification. For example, many clients across the U.S. with olive undertones require a slightly cooler base with warm modifiers added sparingly to avoid an orange healed color.
Use a small starter palette of neutral bases and tone modifiers. Over time, you’ll expand to include cool, warm and extra-deep shades designed for higher Fitzpatrick skin types.
- Neutral browns (light, medium, dark)
- Cool brown modifier (to counter warmth)
- Warm brown modifier (to prevent ashy healed results)
- Deep brown/black-brown for high-contrast brows
- Mixing carrier solutions and sterile saline if recommended by pigment manufacturer
- Patch test/sample jar for client sensitivity checks
- Documentation of pigment batch numbers and expiration dates for client records
- Shade guides and healed photos from manufacturers to understand expected fades
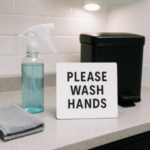
Safety, Hygiene & Sanitation: Non-Negotiables
Tools and pigments needed to start microblading are only useful if used within a safe, sanitary system. In the United States, local and state health departments regulate blood-borne pathogen (BBP) practices, sharps disposal and clinic hygiene. Proper PPE, single-use disposables and documented protocols protect your client and your business.
We recommend following CDC guidance on standard precautions for invasive cosmetic procedures and maintaining BBP training and certification where applicable. Many states require BBP certification as part of their licensing or permit process for microblading.
- Always use single-use, sterile blades or cartridges
- Wear nitrile gloves and change them whenever contamination occurs
- Use EPA-registered hospital-grade disinfectants for surfaces
- Keep a documented cleaning log and client records including consent and patch tests
- Comply with local sharps and biohazard disposal laws
- Never re-cap needles or attempt to re-sterilize single-use disposables
- Maintain proper pigment storage: cool, dark, and sealed
- Perform patch tests for clients with allergy histories
Quote from an industry official: “Maintaining strict infection control protocols and using pigments tested for PMU applications minimizes client risk and increases predictable healing outcomes,” — CPTP representative. This aligns with our training ethos: technique and safety go hand-in-hand.
At Skinart United States, sanitation and safety are a core part of the microblading curriculum. We teach legal compliance, BBP modules and practical clinic routines so new technicians can operate confidently in U.S. environments.
Setting Up Your Microblading Station: Supplies, Costs and Workflow
Putting together the tools and pigments needed to start microblading also means planning your workspace. A compact, hygienic, and well-lit station improves ergonomics and client trust. Here’s a practical breakdown of what you’ll need and budget considerations for a U.S.-based start-up microblading setup.
Startup costs vary by brand choice, but expect to spend more on well-tested pigments and certified blades. Price shopping for cheap equipment rarely pays off; quality materials deliver better healed results and fewer complications.
- Portable treatment bed or chair — $150–$700 depending on features
- LED daylight lamp and magnifier — $60–$300
- Professional pigment starter set (4–6 shades) — $100–$350
- Disposable blades and cartridges (box quantities) — $40–$200 per box
- Accessory kit (pigment rings, micro swabs, gauze, tape) — $30–$100
- BBP training and certification — varies by provider, $30–$150
- Sharps container and biohazard disposal fees — initial $20–$75
- Insurance and local permits — variable, budget $300–$800 annually for small business insurance
Practical workflow tip: keep a pre-packed disposable tray for each client. Pre-counted gloves, pre-filled pigment rings and single-use blades speed the session and reduce contamination risk.
Local example: a Skinart student in Austin, TX reported that investing in a slightly higher-priced daylight lamp and LED magnifier improved her retention and reduced eye strain, speeding her transition from learner to paid appointments within three months.
Aftercare, Pigment Retention and Troubleshooting
Even the best tools and pigments need good aftercare to produce excellent healed results. Client education on aftercare is as critical as your selection of pigments: healing protocols influence how much pigment is retained and whether the healed color remains true to the selected shade.
Provide clear, written aftercare instructions and explain common healing stages so clients know what to expect. Issues such as scabbing, premature exfoliation, or excessive sun exposure can reduce retention regardless of pigment quality.
- Keep the area dry for the first 48–72 hours as instructed
- Avoid swimming, saunas and heavy sweating for at least 7–10 days
- Use approved aftercare ointment sparingly and only as directed
- Schedule a color-correcting or top-up appointment within the recommended timeframe
Troubleshooting: If pigment appears too warm on day 7, it may cool over the next weeks. Persistent warmth at 6–8 weeks could indicate incorrect initial color choice or client skin chemistry. This is where training in color theory — part of Skinart United States courses — helps you correct and plan touch-ups responsibly.
Where to Buy and How to Vet Suppliers (U.S.-Focused)
In the United States, buy pigments and tools from specialized PMU distributors, certified manufacturers, or authorized resellers. Avoid generic marketplaces for pigments unless the seller is an established brand distributor. Reputable brands publish ingredient lists, provide MSDS sheets, and offer technical support.
When vetting suppliers, check for:
- Transparent ingredient lists and MSDS documentation
- Positive, verifiable trainer or academy endorsements
- Clear guidance for mixing and dilution specific to microblading
- Batch numbers and expiration dates on pigment packaging
- Accessible technical support and replacement policies
Skinart United States recommends asking manufacturers for technical sheets and healed photo galleries before purchasing. Viewing healed work across different skin types is the best way to judge how a pigment will behave in practice.
Frequently Asked Questions
Below are common questions clients and newly qualified artists ask about tools and pigments needed to start microblading.
What basic tools and pigments do I need to start microblading?
At a minimum, you’ll need single-use microblading blades or cartridges, a manual handle, a starter set of PMU pigments (neutral base shades and modifiers), measuring tools for brow mapping, disposable supplies (gloves, gauze, pigment rings), a magnifying lamp, and appropriate disinfectants and sharps containers.
How should I choose pigments for different skin tones?
Choose neutral pigments as your base, then use cool or warm modifiers to correct undertones. For darker Fitzpatrick types, select pigments formulated for higher melanin levels and expect heavier deposition — training in color theory helps you predict healed color and reduce surprises.
Are tattoo inks the same as microblading pigments?
No. Tattoo inks are formulated for deeper dermal placement and often include additives and carriers unsuitable for superficial microblading work. Use PMU-specific pigments designed for superficial placement and predictable fading.
Do I need to buy equipment from Skinart United States?
Skinart United States provides accredited training but does not supply microblading equipment in the United States. We teach you how to evaluate and choose tools and pigments so you can buy the right kit from trusted suppliers after learning.
How many pigment shades should a beginner have?
A beginner should start with 4–6 high-quality pigment shades: light, medium, dark neutrals plus cool and warm modifiers. This allows mixing to match a wide range of natural brows and skin undertones without overcomplicating your kit.
Final Thoughts: Ready to Build a Professional Kit?
Assembling the tools and pigments needed to start microblading is both practical and strategic. Start with reliable blades, a modest pigment palette, and strict sanitation routines. Combine that with accredited training and a plan for continued learning, and you’ll be well-positioned for success.
Every career begins with the first kit and the first client. With the right foundation you’ll grow confidence in color theory, stroke technique and healed results. Skinart United States equips you with that knowledge — our online microblading course focuses on the skills you need to select, mix and use pigments safely and effectively.
We don’t provide equipment in the United States, but our training ensures you know what to buy, why to buy it, and how to use it for consistent, professional outcomes.
Recent Blog Posts
- Studio Etiquette Update: Professionalism in 2026
 Workplace Etiquette for Body Art Studios Refresh your studio etiquette and build a reputation for professionalism with these up-to-date best practices.… Read More »Studio Etiquette Update: Professionalism in 2026
 - 🌙 Eid Mubarak: Celebrate with 5% Off in 2026!
 Eid Savings: 5% Off All Courses Celebrate Eid with a special offer: 5% off any course. Use code EID5 at checkout.… Read More »🌙 Eid Mubarak: Celebrate with 5% Off in 2026!
 - Top Mistakes New Body Artists Should Avoid (2026)
 Stay Ahead: Common Pitfalls for New Artists Read up on the most frequent errors new body artists make, and how to… Read More »Top Mistakes New Body Artists Should Avoid (2026)