Top Permanent Makeup Mistakes and How to Avoid Them

Permanent Makeup Mistakes can cost you time, money and client confidence. Whether you’re starting out or refining your skills, understanding common errors and learning how to prevent them will lift your results, build trust with clients in the United States, and reduce the need for corrective work.
In this comprehensive guide we’ll walk through the top pitfalls technicians face — from poor colour selection and inadequate consultation to infection control and legal oversights — and give practical, step-by-step advice to avoid them. The guidance here is based on decades of industry experience and real-world examples from US clinics.
Written by Gary Erskine, lead tutor at Skinart United States — over 25 years training permanent makeup artists worldwide. This article is designed to help you spot Permanent Makeup Mistakes early and adopt methods that protect your clients, your reputation, and your business.
Table of Contents
- Understanding the Core Concepts
- Tools, Pigments and Pros & Cons
- Skin Assessment and Preparation
- Common Technique Mistakes to Avoid
- Aftercare and Healing Mistakes
- Regulatory and Safety Issues
- Client Communication & Consent
- FAQs
- Final Thoughts
Use these anchor links to jump to sections — search engines may show “Jump to” links for quick access.
Understanding the Core Concepts
Before you can prevent Permanent Makeup Mistakes you need a clear framework: anatomy of the skin, how pigments interact with dermal tissue, and how individual healing shapes final results. Permanent makeup isn’t simply “drawing” on skin — it’s a controlled implantation of pigment that responds to biology and technique.
Technicians who understand the variables — client skin type, pigment chemistry, instrument settings, and healing timelines — make more consistent decisions and fewer costly errors. This section explores those core concepts in practical terms you can apply during consultations and treatments.
We’ll also cover why the most common Permanent Makeup Mistakes originate from skipping basic checks: inadequate consultation, incorrect pigment choice, or a rushed patch test. Investing a little more time up-front prevents a lot of corrective work later on.
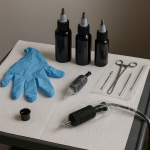
Tools, Pigments and Pros & Cons
Choosing the right tools and pigments is one of the most common sources of Permanent Makeup Mistakes. Decisions about needle configuration, machine settings, and pigment family can make the difference between a crisp healed shape and blown-out, muddy colour.
Below is a short, practical pros/cons list to help you weigh common options. This will help you avoid selection errors that lead to patchy fades, discolouration, or migration.
- Machine type — rotary vs. digital: Pros: quieter, smoother strokes (rotary). Cons: some machines lack fine control at low speeds and may deposit too much pigment for subtle shading.
- Needle configurations: Pros: microblading needles create hair-like strokes; magnum shaders give soft fills. Cons: wrong grouping or depth increases trauma and blowout risk.
- Pigment chemistry: Pros: quality pigments are stable and fade predictably. Cons: inferior pigments may change hue over time (e.g., red turning orange or blue).
- Sterile disposables vs reusable tooling: Pros: disposables reduce cross-contamination risk. Cons: higher ongoing cost — but safety outweighs cost.
Two follow-up tips: always test a small area if you’re switching pigment families and document your machine settings per client. Record needle grouping, needle depth (in millimetres), speed, and the pigments used; these notes will save you when you need to predict healed outcomes or do a correction.
Remember: Skinart United States does not supply equipment for Permanent Makeup in the United States. Our training focuses on technique, safety, and decision-making so you can choose and use your own professional tools confidently and avoid the classic Permanent Makeup Mistakes associated with equipment mismatch.
Skin Assessment and Preparation
Many Permanent Makeup Mistakes stem from insufficient skin assessment. A thorough skin evaluation before you touch the pigment helps you choose technique, pigment concentration, and aftercare that align with the client’s healing physiology.
Start with questions: recent cosmetic procedures (chemical peels, retinol use), medical history (autoimmune conditions, diabetes), and lifestyle factors (sun exposure, smoking). All of these influence healing and pigment retention.
Then perform a simple visual and tactile check: skin thickness, oiliness, elasticity, and scar tissue presence. Document everything in the client file and take clear reference photos. This small investment in preparation prevents many Permanent Makeup Mistakes.
- Check for active skin conditions (eczema, rosacea in treatment area).
- Ask about recent fillers or Botox — timing affects swelling and distortion.
- Perform a small patch test for clients with sensitive skin or allergy concerns.
- Document Fitzpatrick skin type; darker skin often needs conservative pigment choices to avoid ashy or muddy heals.
- Note history of keloid or hypertrophic scarring; avoid aggressive depth or techniques that cause excess trauma.
- Check medication list: blood thinners and certain supplements increase bleeding and pigment washout.
- Evaluate client expectations and show realistic healed results based on their skin.
- Use before photos as baseline for later touch-ups and corrections.
Common Technique Mistakes to Avoid
Technique-related issues are among the top Permanent Makeup Mistakes we see in clinics: inconsistent depth, improper needle angle, and boom-or-bust pigment pressure. Each leads to uneven healing, poor retention, and increased client dissatisfaction.
Treat every stroke as a micro-decision: where is the dermal-epidermal junction at this location? How much pressure is needed to deposit pigment without causing excessive trauma? If you can’t answer these reliably every time, your technique needs work.
Below is a long checklist of technical pitfalls and how to prevent them. Use it as a working training checklist for apprentices and for your own quality audits.
- Uneven needle depth — causes patchy healing and patchy retention. Prevent by setting needle depth consistently and testing on a practice pad before client work.
- Too aggressive passes — more strokes do not equal better saturation; they increase trauma and scarring risk.
- Incorrect needle angle — hair stroke techniques require a shallow angle, shading may need steeper angles.
- Insufficient pigment loading — using a low pigment concentration or over-diluting leads to fast fade.
- Overuse of topical anaesthetics — can change skin pliability and mask bleeding; avoid excessive use.
- Starting without mapping — skip mapping and result will be asymmetry or poor placement.
- Poor stretched-skin technique — not stabilising tissue leads to wobble and inconsistent strokes.
- Neglecting to layer conservatively — aggressive heavy fills on first appointment often look overworked when swollen.
- Failing to perform a test patch in reactive skins — allergic reactions or unpredictable retention happen when you skip testing.
- Not adjusting technique for prior tattooing or scar tissue — scar tissue needs different speed, pressure and pigment choice.
Aftercare and Healing Mistakes
Poor aftercare is responsible for a large slice of the Permanent Makeup Mistakes that lead to broken pigment and infection. Clear, realistic aftercare instructions, and verifying client understanding, dramatically reduce complaints and revision work.
Common aftercare errors include recommending inappropriate products, under-emphasising sun protection, and failing to warn about scabbing and pigment lightening during the first two weeks. Below are actionable guidelines that you can adapt for client leaflets.
- Give written aftercare instructions and review them verbally with the client before they leave.
- Explain normal healing stages (redness → scabbing → lightening → settling) so clients don’t panic.
- Warn about chlorine, prolonged sun, and exfoliation products — all accelerate fading and can create uneven pigment loss.
- Recommend gentle cleansing only; avoid scrubbing or picking scabs which causes pigment loss and scarring.
- Be explicit about when to return for touch-ups (typically 6–12 weeks) and why rushing a touch-up is a mistake.
- Provide emergency contact steps for signs of infection or adverse reaction — client safety is paramount.
- Document aftercare conversations in the client file; it protects you if there’s a dispute.
- Adjust aftercare for skin type — oily skin requires different guidance than dry or mature skin.
Regulatory and Safety Issues
Regulatory compliance and safety protocols are non-negotiable. Permanent Makeup Mistakes related to hygiene, bloodborne pathogen control, and inadequate documentation can lead to serious consequences. In the United States, clinics must follow state and local rules and adhere to best practices for infection control.
Sources like the Centers for Disease Control and Prevention (CDC) provide guidance on bloodborne pathogen control and safe injection practices. Familiarise yourself with local health department requirements and ensure your client consent forms and medical questionnaires meet or exceed those standards.
We recommend following accredited course training and certification standards for BBP and sterile technique; Skinart’s Permanent Makeup course integrates these protocols into the curriculum to reduce risk and prevent Permanent Makeup Mistakes that arise from lapses in safety.
Helpful references: the CDC’s infection control resources (https://www.cdc.gov/niosh/topics/bbp/) and the FDA’s information on tattoo pigments and safety can be a useful starting point for US technicians.
Client Communication and Consent
Many Permanent Makeup Mistakes are communication failures. When clients don’t have realistic expectations, misunderstandings lead to complaints even if the technical work was competent. Clear, structured consultations reduce this risk.
During consultation: show healed photos, explain likely colour changes, outline the two-step process (initial session + touch-up), and get explicit written consent that covers allergies, medical history, and understanding of healing stages.
Good communication also means telling clients about limitations: for example, if they’ve had prior tattooing or intense sun damage, explain how results will differ. A client who understands trade-offs is far more likely to be satisfied.
Top 12 Permanent Makeup Mistakes (and How to Avoid Them)
This checklist gives you the most frequent mistakes we encounter across hundreds of students and practitioners — with immediate actions you can take to avoid them. Use this as part of your competency checklist.
- Skipping a detailed consultation: Always use a structured intake form and photos.
- Poor pigment matching: Swatch pigments and consider healed biases by skin type.
- Incorrect needle depth: Mark consistent depth and rehearse on practice skin before working on a client.
- Overworking during the first session: Layer conservatively; schedule touch-ups instead of overfilling.
- Inadequate infection control: Follow BBP protocols, wear PPE, and use sterile disposables.
- Not accounting for skin tension: Stretch skin and stabilise to create clean strokes.
- Lack of documentation: Record pigments, settings, and aftercare instructions.
- Rushing mapping or symmetry checks: Use grids and take time to measure. Symmetry is planned, not guessed.
- Failing to explain healing timelines: Prepare clients for colour loss and scabbing so they don’t panic.
- Not scheduling a touch-up: Explain that many procedures require refinement at 6–12 weeks.
- Using low-quality pigments: Invest in tested pigments; cheap pigment often leads to discolouration and migration.
- Poor follow-up communications: Check in with clients during the first two weeks and address concerns early.
Each item above is a teachable moment. For example, a US-based client I trained in Texas experienced a dramatic uneven fade after a rushed first appointment elsewhere; a careful consultation and conservative touch-up corrected the shape and rebuilt the client’s confidence. Real-world examples like this show how avoiding simple mistakes improves retention and referrals.
Across Skinart United States training, we emphasise preventive protocols that are simple to implement: thorough intake, documented settings, and staged treatments. These reduce Permanent Makeup Mistakes and protect your growing practice.
Corrections, Touch-ups and When to Refer
Not every Permanent Makeup Mistake requires a dramatic fix; many can be improved with the correct touch-up strategy. Understanding when to correct, when to camouflage, and when to refer to a specialist is vital for client safety and outcomes.
Conservative protocol: if the error is a colour shift or minor fade, schedule a corrective session after full healing (generally 8–12 weeks). For deeper issues like heavy blowout or hypertrophic scarring, refer to a medical professional or a PMU artist experienced in corrective work.
Document the problem, explain options clearly with before/after mock-ups, and get informed consent before any corrective intervention. Clients appreciate transparency and a clear plan — that goodwill alone reduces dissatisfaction and strengthens your professional reputation.
- Cosmetic camouflage — when small areas need blending.
- Colour correction — require conservative neutralising pigments layered over time.
- Laser or light-based removal — refer to licensed clinics for stubborn pigments or poor-quality inks.
- Surgical revision — for severe scarring, a surgical consult may be required.
Industry Voices and Official Guidance
Authoritative guidance supports safe practice. For example, the Centers for Disease Control and Prevention underscores the importance of bloodborne pathogen training and safe sharps disposal. Municipal health departments in the United States have also emphasised strict cross-contamination controls for tattoo and PMU studios.
“Adhering to infection control practices protects both the client and the operator — it’s a cornerstone of safe cosmetic tattooing.” — CDC guidance summary
We recommend every practitioner keep current copies of local health department regulations and BBP training certificates in the client file. These documents not only help avoid mistakes but demonstrate professional accountability if an issue arises.
Why Professional Training Prevents Permanent Makeup Mistakes
Good training teaches technique, but it also teaches decision-making: when to stop, when to refer, and how to communicate complex outcomes simply. Our accredited Permanent Makeup course combines theory, safety, and practical skills to reduce common errors and improve client outcomes in the United States market.
Enrolling in a structured course helps you adopt industry-standard protocols and get feedback from experienced tutors. That feedback loop is what separates hobbyists from respected professionals who avoid the everyday Permanent Makeup Mistakes that undermine careers.
Skinart United States offers an accredited online Permanent Makeup course designed to give you the technical confidence and the regulatory knowledge you need. If you want to reduce mistakes and grow your PMU practice safely, our course is tailored for US regulations and client expectations.
Frequently Asked Questions
What are the most common Permanent Makeup Mistakes?
The most common mistakes include poor pigment selection, inconsistent needle depth, inadequate consultation, and lapses in infection control. Each can be reduced with structured training and strict protocols.
How can I avoid pigment discolouration after healing?
Choose high-quality pigments suited to the client’s skin tone, layer conservatively, and avoid overworking during the first session. Document pigments and educate clients about sun protection and scheduled touch-ups.
What aftercare advice prevents common complications?
Recommend gentle cleansing, avoid picking scabs, protect from sun and pools, and provide written instructions and a contact point for concerns. Clear aftercare reduces infection and patchy healing.
Do I need BBP certification for PMU in the United States?
Yes — most states expect operators to complete bloodborne pathogen training and follow sharps and waste disposal regulations. Check your local health department for exact requirements.
When should I refer a client for medical help after PMU?
Refer clients if you see signs of spreading redness, fever, severe swelling, or pus — these may indicate infection. Early medical advice protects the client and your practice reputation.
Final Thoughts
Avoiding Permanent Makeup Mistakes is mostly about slow, considered decisions and disciplined protocols. Invest in your consultation, document carefully, use appropriate tools and pigments, and always prioritise client safety. Those habits will protect your reputation and lead to reliable healed results.
If you’re serious about mastering PMU technique and preventing these common errors, structured training with an accredited provider is the fastest, safest route. Our accredited Permanent Makeup course is tailored for artists working in the United States and covers the practical knowledge needed to avoid mistakes and grow a professional practice.
Take the next step: commit to learning robust technique, evidence-based safety, and client-focused communication — your clients and your career will thank you.
Ready to Reduce Mistakes and Build Confidence?
Recent Blog Posts
- Studio Etiquette Update: Professionalism in 2026
 Workplace Etiquette for Body Art Studios Refresh your studio etiquette and build a reputation for professionalism with these up-to-date best practices.… Read More »Studio Etiquette Update: Professionalism in 2026
 - 🌙 Eid Mubarak: Celebrate with 5% Off in 2026!
 Eid Savings: 5% Off All Courses Celebrate Eid with a special offer: 5% off any course. Use code EID5 at checkout.… Read More »🌙 Eid Mubarak: Celebrate with 5% Off in 2026!
 - Top Mistakes New Body Artists Should Avoid (2026)
 Stay Ahead: Common Pitfalls for New Artists Read up on the most frequent errors new body artists make, and how to… Read More »Top Mistakes New Body Artists Should Avoid (2026)