Piercing Tools for Beginners: Full Kit Breakdown
Piercing Tools for Beginners is a topic every aspiring piercer in the United States needs to understand before they work with clients. Whether you are preparing a first kit, assembling supplies for a home study course, or auditing a professional setup, knowing what tools belong in a safe, compliant kit matters for client safety, legal compliance, and the quality of your work.
This full kit breakdown takes you step-by-step through the instruments, consumables, and supporting equipment every beginner should become familiar with. We explain why each item is used, what to look for when buying, and common pitfalls new piercers face. It’s designed to be a practical companion for students of Skinart United States’ accredited online Piercing course.
Written by Gary Erskine, 25+ years in body art education. Gary has trained thousands of students worldwide and leads the piercing and body art curriculum for Skinart United States. This guide complements our CPD- and BAQA-accredited Piercing course and will help you prepare an informed, professional starter kit.
Table of Contents
- Introduction: Why the Right Tools Matter
- Core Piercing Tools Every Beginner Needs
- Sterilization, Safety & Setup Pros & Cons
- Consumables, Jewelry Types and Selection
- Common Mistakes Beginners Make
- Assembling Your Workbench & Ergonomics
- Legal, Regulatory & Local Guidance (United States)
- Resources, Further Reading & Tools List
- Frequently Asked Questions
- Final Thoughts & Next Steps
Using anchor-linked headings like these helps Google display “Jump to” links in search results — a small SEO step that improves visibility for new piercers searching for “Piercing Tools for Beginners”.
Introduction: Why the Right Tools Matter
Choosing the right piercing tools is as important as mastering technique. Good tools help you perform consistent, safe procedures; poor tools increase the risk of trauma, infection, and dissatisfied clients. For beginners in the United States, where health departments enforce local rules, assembling a proper kit early protects your reputation and helps you build technical confidence.
In this section we’ll set expectations: a starter kit doesn’t need every item on the market, but it must include core instruments, single-use consumables, and sterilization or disinfection equipment appropriate to your training environment. Skinart United States’ accredited Piercing course focuses on practical, compliant setups and teaches tools handling within current safety standards.
Piercing Tools for Beginners isn’t just a shopping list; it’s an education in selection, maintenance, and workflow. In the United States, workplace regulations and recommendations from public health authorities like the CDC shape what counts as “safe” — so we frame this kit with both best practice and local compliance in mind.
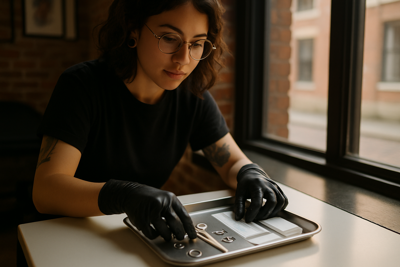
Core Piercing Tools Every Beginner Needs
Below are the essential instruments that form the backbone of a beginner’s kit. Each item is described with its role, selection tips, and practical notes so you can make informed purchases.
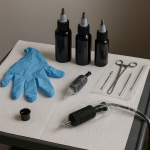
- Needles (single-use, sterile) — Traditional hollow needles sized appropriately to the jewellery. Beginners should start with straight needles and a basic size range (14–18G depending on practice and anatomy).
- Receiving tubes and tapers — Clear acrylic or steel receiving tubes for nostril and ear work; steel tapers help guide jewellery with minimal trauma.
- Forceps (curved and straight) — Stainless steel ringed forceps for holding tissue, retracting skin, and guiding jewellery. Look for smooth tips and comfortable grips.
- Clamp (surgical or ring-type) — Optional depending on technique; clamps can stabilise small tissues but should be used with training and care to avoid crushing.
- Autoclave or access to sterilization — While many training environments use single-use disposables, access to an autoclave is essential for reprocessing reusable tools in a professional studio setting.
- Disinfectant solutions and wipes — EPA-registered surface disinfectants and skin antiseptics such as chlorhexidine or alcohol-based prep pads (follow local guidance).
- Gloves (nitrile) — Multiple sizes, single-use. Nitrile is preferred for chemical resistance; always change gloves when contamination occurs.
- Sharps container and waste disposal supplies — Puncture-proof sharps bins and labeled clinical waste bags are mandatory in most jurisdictions.
Pros: This minimal set lets beginners practice safe, repeatable procedures without unnecessary complexity. Many items are single-use or inexpensive to replace. Cons: You will not be able to supply a full studio service with this alone — in the United States Skinart does not supply piercing equipment, and many states require practice in licensed facilities or under supervision.
Selecting quality needles and forceps is where your money matters most. Cheap needles can bend or dull, causing more trauma. For needles, buy from reputable manufacturers that supply sterile, individually packaged units and list gauge sizes clearly.
Jewellery materials are covered in detail in the next section, but a quick note: beginners should use implant-grade titanium or implant-grade surgical steel for initial piercings. These materials reduce allergic reactions and are widely accepted by public health guidance.
Sterilization, Safety & Setup: Pros, Cons, and Practical Steps
Understanding sterilization and safety is non-negotiable. For beginners, this means learning which items are single-use versus reusable, how to prepare a clean workspace, and how to protect clients and yourself from blood-borne pathogens. Our accredited online Piercing course covers infection control protocols consistent with US public health guidance.
Beginner-friendly approaches favor single-use, sterile disposables for needles and consumables, combined with thorough surface disinfection between clients. Where reusable forceps or steel instruments are used, a validated autoclave cycle and biological indicator testing must be followed.
Your setup should follow a clear workflow: clean room > set up sterile tray > perform antiseptic skin prep > make the piercing using sterile technique > dispose of sharps immediately > document the procedure. In many US jurisdictions, documentation and consent forms are also required for minors and certain anatomical sites.
- Sterile single-use pierce needles
- Pre-packaged antiseptic wipes (chlorhexidine or 70% isopropyl alcohol where recommended)
- Autoclave (if reusing instruments) and spore-test indicators
- Barrier film, disposable covers, and waste bags
- Sharps containers, labeled clinical waste receptacles
- Handwashing station or hand sanitiser with at least 60% alcohol
- CPR/first-aid kit and written emergency procedures
- Client aftercare leaflets and written consent forms
Consumables and Jewellery: Types, Selection, and Practical Tips
- Implant-grade titanium (ASTM F-136 or F-67) — excellent for initial piercings; low allergy risk.
- Surgical stainless steel (316LVM) — common and cost-effective; avoid in clients with nickel allergies.
- Bioplast and PTFE — flexible options for certain anatomies or medical imaging needs.
- Captive bead rings vs. seamless rings — each has insertion and aftercare considerations.
- Labret studs, barbells, and circular barbells — choose the right post length and diameter for swelling.
- O-rings, backing nuts, and retention devices — keep a variety of sizes for secure initial placement.
- Marker pens for placement (single-use surgical markers)
- Disposable paper/film trays and sterile drapes
Selecting jewellery is partly technical and partly aesthetic. For first-time piercings, prioritise hypoallergenic materials and conservative jewellery sizes that accommodate post-procedure swelling. Communicate clearly with clients about aftercare and follow-up sizing adjustments.
Because Skinart United States does not supply piercing equipment, students will source jewellery and consumables themselves. Use reputable US suppliers that provide certificates of material composition and sterile packaging where applicable. Keep invoices and supplier details as part of your studio records.
Common Mistakes Beginners Make (And How to Avoid Them)
- Using the wrong needle gauge for the anatomy — leads to unnecessary trauma and jewellery mismatch.
- Reusing “single-use” supplies — creates infection risk and legal exposure.
- Poor documentation — skipping consent forms or aftercare notes damages trust and can create liability.
- Inadequate skin marking — inconsistent placement causes asymmetry and client dissatisfaction.
- Over-tightening jewellery immediately — constricts swelling and delays healing.
- Improper waste disposal — sharps and clinical waste must follow local rules.
- Insufficient aftercare instructions — clients need clear, written guidance tailored to the piercing site.
- Skipping hands-on supervised practice — theory isn’t enough; supervised repetition builds competence.
Most mistakes stem from rushing or cutting corners on preparation. Build a repeatable checklist for each appointment that covers paperwork, set-up, client briefing, and a post-procedure check. In our online Piercing course, we provide procedural checklists and templates you can adapt to meet local US requirements.
A short anecdote: one former Skinart student in Texas told us that using the wrong initial post length led to client irritation and a return visit — after updating their protocol to always measure for swelling and document choices, return visits for the same issue dropped dramatically. Small procedural changes have measurable outcomes.
Assembly, Ergonomics & Workflow Tips for Beginners
A good piercing station reduces fatigue, supports sterility, and makes procedures faster. Ergonomics matter—especially for beginners who are still building speed and confidence. Set yourself up so you maintain a comfortable posture and have everything you need within reach.
Practical layout tips: position your tray at elbow height, keep a second tray for clean instruments, and store consumables in labelled containers. Use task lighting to illuminate anatomy, and have a mirror or camera available for checking symmetrical placements on clients.
Below is a short checklist to help you assemble a beginner-friendly station:
- Clean, dedicated work surface with barrier film
- Sterile instrument tray with needles, forceps, and receiving tubes
- Glove dispenser (nitrile), hand sanitiser, and handwashing access
- Sharps container within arm’s reach (but out of reach of clients)
- Clinical waste bag and general waste bin
- Aftercare leaflets and client consent forms ready to sign
- Lighting and magnification (as needed)
- Backup jewellery options in case of sizing issues
Legal, Regulatory & Local Guidance (United States)
Piercing regulations in the United States vary by state and local municipality. Many health departments require permits, inspection of premises, sharps disposal procedures, and staff training for bloodborne pathogens. Skinart United States’ online Piercing course includes modules on documentation, client consent, and infection control tailored to US practice standards.
We recommend checking with your state’s health department or local environmental health office before offering paid services. A helpful authoritative resource is the CDC’s guidance on body art: CDC Body Art Recommendations, which outlines infection control basics and links to local resources.
Quote from a municipal health official (example): “Local permitting ensures practises follow infection control standards that protect our community,” said a representative from a municipal health office in a US midwestern city. Work with your local authority early to avoid compliance issues and delays opening a studio.
Resources, Further Reading & a Full Tools Checklist
Below is a comprehensive checklist you can use as a baseline for a beginner’s kit. Use it alongside your local regulatory checklist and the Skinart United States course materials for a complete curriculum-aligned setup.
- Sterile single-use piercing needles (variety of gauges)
- Receiving tubes and acrylic/steel tapers
- Curved and straight forceps (sturdy stainless steel)
- Disposable gloves (nitrile) in multiple sizes
- Antiseptic skin prep wipes (chlorhexidine or alcohol-based)
- Sterile jewellery (titanium, 316LVM steel, PTFE for special cases)
- Sharps container and clinical waste bags
- Autoclave access (for reusable instruments) and spore-test strips
- Marker pens, sterile drapes, barrier film and disposable trays
- Aftercare leaflets and written consent forms
- Lighting, magnification, and ergonomic chair/support
Helpful external references: the CDC body art page (linked above) and your state health department site will outline local requirements for licensure, inspections, and waste disposal. For material standards and biocompatibility, look for ASTM references on implant materials or supplier documentation for jewellery composition.
Piercing Tools for Beginners is an ongoing topic — suppliers update product lines, and public health guidance evolves. That’s why professional training, mentorship, and accreditation matter: they keep you current and ensure your practice is safe and defensible.
Frequently Asked Questions
Below are common reader questions about Piercing Tools for Beginners, answered concisely to help you move forward with confidence.
What are the absolute essentials to start piercing as a beginner?
At minimum: sterile single-use needles, nitrile gloves, forceps, receiving tubes or tapers, antiseptic wipes, sterile jewellery in correct sizes, a sharps container, and written consent/aftercare forms; an autoclave is recommended if you plan to reuse instruments.
Can I use tattoo needles for piercing?
No — tattoo needles are designed differently for tattoo ink deposition and typically are not suitable for creating clean hollow needle channels required for piercing jewellery; always use purpose-made hollow piercing needles.
How do I choose jewellery material for first piercings?
Choose implant-grade titanium or implant-grade surgical steel for initial piercings because they are biocompatible and have lower allergy rates; PTFE or bioplast can be used where flexibility is needed or in medical scenarios.
Where can I find trusted suppliers in the United States?
Look for US-based suppliers with clear material certifications, sterile packaging options, and a track record with professional studios; always request material certificates for implant-grade jewellery and keep supplier records for compliance.
Does Skinart United States provide piercing kits or equipment?
No—Skinart United States provides fully accredited online training but does not supply piercing equipment. Students are responsible for sourcing their own tools and consumables in accordance with course guidance and local regulations.
Final Thoughts & An Encouragement to Get Practical
Building a reliable beginner kit is an investment in safety, client care, and your professional reputation. The items listed in this guide form a pragmatic starting point that balances safety with affordability. Consistent technique, good hygiene, and accurate documentation are what turn a box of tools into a professional practice.
If you’re serious about progressing, combine study with supervised practice. Our course materials, checklists, and tutor feedback will guide you through the competence stages, from simple lobes to more complex anatomies. Safety-first learning protects clients and builds trust — which is the foundation of a long-lasting career.
Take the next step: learn the correct handling of each item in your kit, practise under supervision, and keep up to date with local regulations. Skinart United States is here to help you advance your skills and prepare for accredited, professional work.
Ready to Learn Practical Piercing Skills?
Join Skinart United States’ accredited online Piercing course to learn tool handling, infection control, placement techniques and aftercare from experienced tutors. Our course is CPD and BAQA aligned and tailored for safe practice in the United States.
Latest Blog Posts
- Studio Etiquette Update: Professionalism in 2026
 Workplace Etiquette for Body Art Studios Refresh your studio etiquette and build a reputation for professionalism with these up-to-date best practices.… Read More »Studio Etiquette Update: Professionalism in 2026
 - 🌙 Eid Mubarak: Celebrate with 5% Off in 2026!
 Eid Savings: 5% Off All Courses Celebrate Eid with a special offer: 5% off any course. Use code EID5 at checkout.… Read More »🌙 Eid Mubarak: Celebrate with 5% Off in 2026!
 - Top Mistakes New Body Artists Should Avoid (2026)
 Stay Ahead: Common Pitfalls for New Artists Read up on the most frequent errors new body artists make, and how to… Read More »Top Mistakes New Body Artists Should Avoid (2026)