Step-by-Step Microblading Procedure for Beginners
Written by Gary Erskine, 25 years in microblading education — Skinart United Kingdom
The Step-by-Step Microblading Procedure is the foundation for safe, reliable eyebrow enhancement. Whether you are a complete beginner or transitioning from another beauty discipline, understanding each stage — from consultation to aftercare — will give you the confidence to deliver predictable, professional results for clients in the United Kingdom.
This guide walks you through a complete, accredited microblading workflow with UK-specific considerations, practical tips, and common pitfalls to avoid. It’s designed to complement your training and prepare you for hands-on practice and eventual client appointments. Read on to get a clear, methodical approach that aligns with CPD and BAQA standards.
Table of Contents
Use the links below to jump to any section — search engines may show “Jump to” links for these anchor headings.
- Introduction: What is Microblading?
- Consultation & Pre-Treatment Preparation
- Tools, Consumables and Workplace Setup
- Mapping, Brow Design & Measurement
- Numbing, Infection Control & Safety
- Step-by-Step Microblading Procedure
- Aftercare and Healing Timeline
- Common Mistakes & Troubleshooting
- Regulation, Accreditation & UK Guidance
- Training, Accreditation & Next Steps
- Frequently Asked Questions
- Final Thoughts
Introduction: What is Microblading?
Microblading is a semi-permanent cosmetic technique that creates fine, hair-like strokes by depositing pigment into the superficial dermis using a manual blade. In the Step-by-Step Microblading Procedure a practitioner plans, maps, and executes the design with attention to symmetry, skin type and client expectations. This process is widely taught in accredited courses and is central to professional practice in the United Kingdom.
For beginners, microblading can seem technical — it combines artistry, skin science and stringent hygiene. A methodical step-by-step approach makes it manageable: clear consultation, accurate mapping, correct pigment selection, controlled blade technique, and structured aftercare. Each stage has safety and legal elements relevant to UK practitioners.
Throughout this article we’ll use the phrase Step-by-Step Microblading Procedure to describe the practical workflow you’ll learn in Skinart’s accredited microblading course, including tips aligned to CPD Standards Office and BAQA guidance for safe, ethical practice in the UK.
Consultation & Pre-Treatment Preparation
Before you touch a blade, the consultation sets expectations and identifies contraindications. The Step-by-Step Microblading Procedure begins with a thorough dialogue about medical history, medications, and previous cosmetic treatments. In the UK, practitioners should document consent and provide written aftercare instructions.
- Pros: Builds client trust, reduces complications, allows realistic expectations
- Cons: Time-consuming if rushed; poor documentation increases liability
During consultation ask about anticoagulants, isotretinoin use, recent cosmetic procedures or skin conditions like eczema and rosacea. If in doubt, refer the client to their GP. Having a clear policy for contra-indications is part of good practice in an accredited clinic.
Record photographs (with consent) to show baseline brows and support your treatment notes. These records are essential for follow-up appointments and help with pigment choice and design refinement.
Tools, Consumables and Workplace Setup
Setting up a clean, ergonomic workspace is a practical necessity for running a professional microblading appointment. The Step-by-Step Microblading Procedure relies on consistent, sterile workflow and the right materials. Note: Skinart United Kingdom does not supply microblading equipment — trainees must source tools locally or from approved suppliers.
Below are the typical items you’ll use during a standard microblading service in the UK. This list supports safe practice and helps you plan your setup for client appointments.
- Disposable microblading blades or cartridges (sterile single-use)
- Microblading pen/holder compatible with chosen blades
- Pigments formulated for microblading (choose reputable brands with UK/EU compliance)
- Antiseptic skin cleanser (e.g., chlorhexidine-alcohol solution where permitted)
- Disposable gloves, aprons, and barrier films
- Disposable eyebrow brushes, cotton pads and wooden applicators
- Numbing cream (topical), with clear client guidance and patch testing
- Measuring tools: callipers or precision rulers and brow pencils for mapping
- Medical waste bin and sharps container
- High-quality magnification lamp and loupe for fine work
Always check UK-specific guidance for product use and waste disposal. Local environmental health departments in the UK provide regulations on sharps and clinical waste collection; register your business or work from a compliant premises if needed.
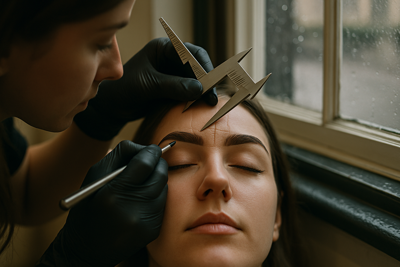
Mapping, Brow Design & Measurement
Mapping is where art meets measurement. Your goal is to design a brow that flatters the client’s face shape and respects facial landmarks. Precision here is crucial: poorly mapped brows cannot be fully corrected by pigment alone.
Start with the baseline measurements — medial, apex, and tail points — using calipers or a fine brow ruler. Use a removable brow pencil to draw each guideline and confirm symmetry with the client seated upright and relaxed.
Consider hair direction, natural brow density, and the client’s desired look. For beginners, practice mapping repeatedly on paper and mannequins; confident mapping reduces procedure time and improves outcomes when you move to real skin.
- Measure from the glabella for the start point
- Use the highest point of the brow arch to determine the apex
- Ensure tail length aligns with the outer canthus
- Check angles from multiple viewing positions
- Confirm with the client before numbing
- Take pre-procedure photographs
- Note hair direction and natural gaps
- Plan stroke orientation to mimic natural hair
Numbing, Infection Control & Safety
Comfort matters for clients and steady hands. Numbing is commonly used, but it must be applied safely: always perform a patch test where indicated, explain risks, and follow manufacturer guidance for topical anaesthetics. Never exceed safe quantities.
Infection control is non-negotiable. Use single-use sterile blades, change gloves after touching non-sterile items, and maintain a clean tray system. Dispose of sharps in a UK-compliant sharps bin and arrange professional clinical waste collection.
As an accredited provider, Skinart recommends following CPD Standards Office guidance and local environmental health recommendations. In our training we emphasise record-keeping, client screening, and emergency procedures for adverse reactions.
Step-by-Step Microblading Procedure
This section gives a detailed, practical Step-by-Step Microblading Procedure suitable for beginners who have completed accredited theory training and are moving into supervised practice. Follow each step carefully, and practice on synthetic skins before live clients.
Begin with everything laid out and PPE ready. Confirm client identity, consent, and mapping one final time. Clean the treatment area and apply numbing according to your clinic protocol. Then proceed with strokes in controlled passes.
Key principles: work slowly, keep the skin taut, and maintain consistent blade angle and stroke length. If blood or excessive serous fluid appears, pause to blot and re-evaluate. Avoid overworking the same area — microblading is a layering process, not an aggressive single pass.
- 1. Final checks: client confirmation, consent, photographs
- 2. Surface cleanse and antiseptic application
- 3. Brow mapping and drawing with pencil
- 4. Apply topical anaesthetic if appropriate (observe recommended time)
- 5. Select pigment shade and perform a small colour test
- 6. Load sterile blade into the pen and hold at 30–45° angle
- 7. Start lateral strokes at the tail, moving medially with hair-direction strokes
- 8. Maintain consistent depth — target the superficial papillary dermis
- 9. Wipe excess pigment gently and assess density regularly
- 10. Perform a second pass only if required to fill sparse areas
- 11. Clean the area and apply a protective balm per your aftercare protocol
- 12. Take post-procedure photos and provide verbal & written aftercare instructions
- 13. Schedule a 6–8 week top-up appointment for pigment refinement
Aftercare and Healing Timeline
Proper aftercare is vital to ensure pigment retention and reduce the risk of infection or poor healing. Provide clients with straightforward written instructions and set realistic expectations about the healing process.
Healing typically follows this timeline: initial redness and swelling in 24–48 hours, light scabbing and pigment darkening over the first week, flaking in week 1–2, then gradual softening and settling of colour over 4–8 weeks. Full maturation of pigment occurs at the top-up appointment.
Encourage clients to avoid heavy exercise, swimming, saunas, and exfoliating products during the first two weeks. Advise sun protection after healing to help maintain colour longevity.
- Day 0–2: Redness, slight tenderness
- Day 3–7: Light scabbing and itchiness — do not pick
- Week 2–4: Pigment may appear faint as superficial flakes shed
- Week 6–8: Colour stabilises — schedule top-up
- Avoid chemical peels or laser near treated area for 6 months
Common Mistakes & Troubleshooting
- 1. Overworking the skin — leads to scarification and poor retention
- 2. Incorrect depth (too shallow or too deep) — causes pigment blowout or early fading
- 3. Poor mapping — asymmetry that’s difficult to correct
- 4. Wrong pigment shade — cold/ashy results or noticeable mismatch
- 5. Using non-sterile equipment or reusing blades — infection risk
- 6. Inadequate aftercare instructions — leads to client confusion and poor healing
- 7. Rushing the procedure — compromises technique and hygiene
- 8. Not accounting for skin type (oily/aging) — affects stroke crispness and pigment retention
- 9. Insufficient lighting/magnification — missed detail in strokes
- 10. Poor documentation — no baseline photos or treatment records
When problems occur, review your notes and photos. For retention issues, evaluate skin type and consider patch testing different pigments or adjusting technique. For complications like prolonged redness, involve medical professionals and document communications.
In our training we cover troubleshooting in depth, including corrective colour theory and when to refer a client for medical input. Gaining experience under supervision is the best way to learn to recognise and resolve these issues safely.
Regulation, Accreditation & UK Guidance
The microblading field in the UK is governed by local health regulations and industry standards rather than a single national licence. Accredited training (CPD and BAQA) demonstrates competence and helps practitioners meet best-practice expectations for infection control and client safety.
As the CPD Standards Office highlights, structured education and documented learning outcomes are central to safe practice. Many local councils expect premises to be registered when offering invasive cosmetic treatments; check your local authority for registration requirements.
Quote: “Proper education and clinical governance reduce the risk of harm and protect clients,” says a representative from the CPD Standards Office. Adhering to accredited processes and good documentation will protect your clients and your business.
Training, Accreditation & Next Steps
Completing an accredited microblading course is the right first step. Skinart United Kingdom offers a comprehensive online Microblading course accredited by the CPD Standards Office and BAQA. The course covers the Step-by-Step Microblading Procedure, infection control, mapping, colour theory and business essentials for the UK market.
Important local notes: we do not supply microblading equipment in the United Kingdom and we do not offer in-person training in the UK. Our course prepares you to practise safely and confidently once you have access to appropriate supervised practice and equipment sourced locally.
- Comprehensive theory modules and practical demonstrations
- Accredited by CPD Standards Office & BAQA
- Supportive resources for mapping, colour and aftercare
- Guidance on setting up a compliant UK service
- Access to tutor feedback and community support
To enrol or learn more about course modules, click the button below. Our online course is designed to fit around your schedule and to build the Step-by-Step Microblading Procedure knowledge you need to progress to hands-on practice.
Industry Voices
“Accredited education and meticulous record-keeping are the best defences against avoidable harm. Practitioners should prioritise training and hygiene above all else.” — CPD Standards Office (paraphrased advisory)
We include direct, practical infection control checklists in our course so trainees can implement UK-appropriate governance immediately in their practice.
UK Success Stories & Local Examples
Many Skinart trainees across the UK have used the Step-by-Step Microblading Procedure from our course to launch successful businesses. For example, a graduate in Manchester built a client base focusing on corrective eyebrows for those who previously had poor microblading work. She credits structured mapping and careful colour matching with turning her practice into a reliable service.
Another trainee from Brighton successfully integrated microblading into a beauty salon by implementing clear consent protocols and documenting each procedure. These real-world examples show how the methodical approach taught in the course translates into trust and repeat business.
- Realistic client briefs and clear aftercare lead to better reviews
- Accreditation reassures new clients in competitive UK markets
- Thorough documentation mitigates disputes and clarifies expectations
Frequently Asked Questions
Below are common questions beginners ask about the Step-by-Step Microblading Procedure.
How long does a typical microblading session take?
A full microblading session usually takes 90–150 minutes, including consultation, mapping, numbing and the procedure itself; beginners should allow extra time while gaining confidence with the workflow.
Can anyone be treated with microblading?
Not everyone is a candidate — contraindications include certain skin conditions, recent isotretinoin use, uncontrolled medical conditions and some medications; a thorough consultation and possible GP referral are required for safety and compliance.
How soon is a top-up needed after the initial treatment?
A touch-up is normally scheduled 6–8 weeks after the initial procedure to refine strokes and settle any areas with lighter retention; this is a standard step in the Step-by-Step Microblading Procedure to achieve optimal results.
Will microblading hurt?
Sensitivity varies by client. Topical numbing reduces discomfort for most people; clear communication and a calm environment help clients tolerate the procedure comfortably.
Final Thoughts
Mastering the Step-by-Step Microblading Procedure takes time, practice, and quality education. Start with sound theory, practise on synthetic skins, document everything, and follow the regulatory guidance relevant to your UK location. The process is rewarding and professional when approached methodically.
Skinart United Kingdom’s online Microblading course is developed to give you the structured knowledge you need to progress safely. Our clear, accredited curriculum helps new practitioners gain confidence with mapping, stroke technique and aftercare — the exact building blocks of long-term success.
Ready to Learn the Complete Procedure?
Enroll in our accredited online microblading course to master the Step-by-Step Microblading Procedure with expert feedback and CPD/BAQA recognition.