Tattoo Linework Practice Techniques for New Artists
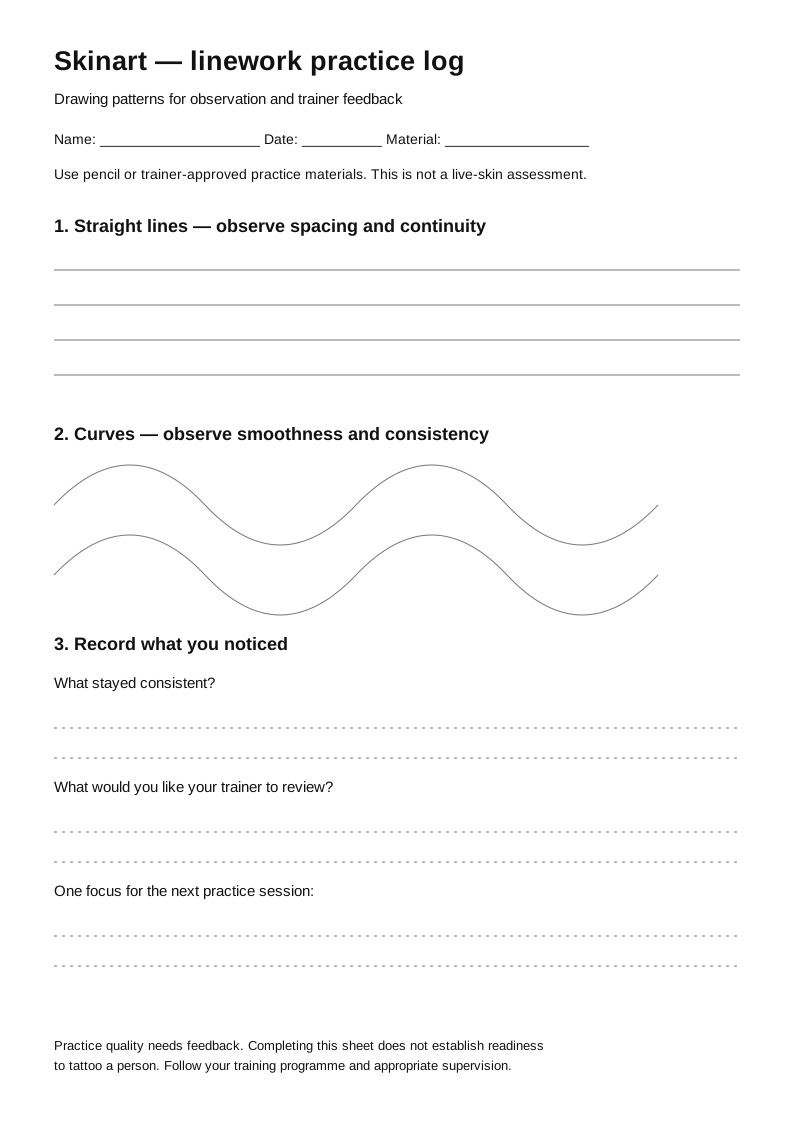
Start with one practice goal: observe the continuity and consistency of your lines on paper or trainer-approved practice material. Keep a dated record, compare attempts and ask for feedback before moving to a more demanding task. These exercises do not establish readiness to tattoo a person.
Use the printable sheet to record what you notice and the questions you want your trainer to review. It provides drawing patterns and a learning log, not machine settings or instructions for live skin.

Use the drawing exercises below to study line continuity, spacing and planned shapes. They work with a pencil or drawing pen on paper. Machine exercises require the separate instructions and feedback provided by your trainer.
Use this guide to prepare questions about linework study and assigned exercises. Confirm the materials, activity and assessment with your tutor rather than assuming every drill here forms part of a particular course. Progress depends on your work and feedback; a fixed weekly improvement is not promised.
Table of Contents
Use the links below to jump to sections — we recommend bookmarking this page as your practice checklist.
- Core Concepts of Tattoo Linework Practice Techniques
- Tools, Supplies and Safe Setup
- Paper Drawing Exercises
- Reviewing Your Paper Exercises
- Keeping Practice Records Consistent
- Tracking Progress and Setting Goals
- Translating Practice to Real Client Work
- FAQs — Tattoo Linework Practice Techniques
- Final Thoughts & Next Steps
- Join Our Accredited Tattoo Course
Core Concepts of Tattoo Linework Practice Techniques
A useful drawing exercise has a visible goal: a continuous curve, evenly spaced parallel lines or a shape that follows its guide. Compare the result with that goal and record what you notice without treating the drawing as evidence of how a tattoo would heal.
On paper, separate the design from the attempt. Draw or print a light guide, trace it with your chosen drawing tool, and keep both visible so you can compare them.
Change one feature of the drawing exercise at a time, such as the size of a curve or the spacing between lines. This makes comparisons easier; it does not translate into a machine setting or a depth prescription.
Tools, Supplies and Safe Setup
Set up the study area for the assigned activity and confirm the equipment and handling requirements with the tutor. Practice materials and a home workspace do not establish readiness or permission for client work.
Keep paper practice and machine practice distinct:
- Paper exercises let you compare shapes and spacing using ordinary drawing materials.
- Synthetic practice material does not reproduce a person’s skin or healing response.
- Use only the equipment specified for a machine assignment, with its handling instructions.
- Do not infer equipment suitability from price or a generic beginner-kit label.
Ask for the exact equipment and consumable specifications for the assignment before purchasing. Confirm compatibility and included materials; do not assume the course has approved every supplier or starter kit.
Choose a well-lit drawing surface where the guide and your marks are easy to see. Pause if you become uncomfortable rather than forcing yourself to finish a long session.
Practice Drills and a 12-Week Progression Plan
Choose one paper exercise, keep the first attempt and compare it with a later attempt after feedback. There is no fixed twelve-week schedule that establishes tattooing competence.
Begin with a simple shape on paper. Increase complexity only when it helps answer a clear practice question, such as whether your spacing changes around a curve.
The following are drawing exercises, not instructions for using needles on a person. Choose a manageable amount of practice and stop when you can no longer give it useful attention.
- Straight lines: draw a light guide and compare a second line against it, noting where the paths separate.
- Connected segments: draw short adjoining lines and inspect the joins for gaps or overlaps.
- Curves and ovals: draw a guide shape and compare the outline of your next attempt.
- Circles and spirals: look for abrupt changes in the curve and mark them for review.
- Parallel lines: choose a spacing on paper and compare the gaps at several points.
- Line weight: use a drawing pen or pencil to explore deliberate variations in width; label the tool used.
- Crosshatching: draw intersecting sets of lines and compare how spacing changes the apparent tone.
- Dot rows: draw dots on paper and compare the gaps between them.
- Direction study: draw the same paper shape in two orientations and record which parts differ.
- Drawing-tool comparison: repeat a paper design with two drawing tools and label each result.
- Dots and curves: combine both in a paper pattern while keeping the intended spacing visible.
- Design study: combine a few of the paper patterns into a small original drawing and explain your choices.
Reviewing Your Paper Exercises
Use observations rather than diagnoses when asking for feedback. The following examples describe paper work; they are not corrections for a tattoo on skin.
- Wavering path: mark where your drawing leaves the guide and show the full attempt to your tutor.
- Unexpectedly wide mark: record the drawing tool and material. Do not use a paper mark to diagnose needle depth.
- Uneven line weight: circle the sections you intended to keep uniform and compare them with the rest.
- Repeated tracing: keep the original attempt visible instead of covering every error with another pass.
- Missed curve: show the guide and the resulting line together so the difference is clear.
- Smudging: record the paper and drawing tool, and keep the example for comparison with another attempt.
- Uneven lettering gaps: use a light paper guide to compare the spaces between letters.
- Unclear result: take a well-lit image of the whole exercise and a closer view of the part you want reviewed.
Ask a specific question: “The gap narrows on the right side of this oval; what should I focus on in my next paper exercise?” Keep the answer with the work rather than guessing a machine adjustment.
Keep the exercise and feedback together so you can identify what needs correction. Ask the tutor how to approach the next attempt rather than assuming a particular issue will be resolved within weeks.
Keeping Practice Records Consistent
Make comparisons useful by keeping the exercise brief and recording the drawing tool, paper and intended result. Consistency in your records helps a tutor understand what you attempted.
For drawing practice, arrange the page so you can see the whole shape and work comfortably. A photograph or short clip can help you explain the setup when requesting feedback.
Machine speed and needle depth are not determined by these paper exercises. Follow the separate practical instruction and assessment for your course; do not transfer a setting or sensation from synthetic material directly to a person.
- Start with a simple paper shape to identify the question you want to practise.
- Keep machine assignments separate from paper drawings in your learning log.
- Do not use a metronome or drawing rhythm as a machine-setting prescription.
- Record short practice clips of your hand to identify posture issues you can’t feel while working.
- Set a weekly checklist of drills (straight lines, curves, lettering) and track completion.
Tracking Progress and Setting Goals
Track the exercise and feedback rather than treating hours spent as a competency score. The following records can make a review easier.
Metrics to record:
- Number of focused practice sessions per week
- Total minutes spent on each drill (straight lines, curves, lettering)
- Notes on the intended shape and visible differences
- Dated photographs of paper exercises, with the drawing tool identified
- Tutor feedback and the next exercise agreed
A simple learning log can record the exercise, date, materials, observation and feedback. Preserve earlier attempts so the comparison is honest, including work that did not improve.
Translating Practice to Real Client Work
A small design is not automatically a low-risk first tattoo. Decisions about work on a person require suitable practical supervision, assessment and operating arrangements beyond this article.
Discuss any proposed client work with the responsible supervisor before making arrangements. A paper portfolio or synthetic-skin exercise does not establish readiness for a live procedure.
Keep a dated record of linework exercises and tutor feedback. Compare consistency across repeated practice attempts, then ask your supervisor what still needs improvement. Progress on practice material does not by itself establish readiness to tattoo a client.
FAQs — Tattoo Linework Practice Techniques for New Artists
Below are common questions students ask about Tattoo Linework Practice Techniques and concise, practical answers you can use right away.
How long does it take to improve linework as a beginner?
There is no reliable improvement deadline for every learner. Compare dated attempts and ask for feedback on a specific feature; completing a set number of weeks does not establish practical competence.
What should I practice first: speed or depth?
For the paper exercises here, begin with shape and spacing. Resolve machine speed and depth questions through your separate practical instruction rather than this drawing guide.
Are practice skins useful for learning linework?
Use practice material only for exercises assigned with suitable instructions and feedback. Performance on a substitute surface does not establish readiness to tattoo someone; practical preparation and assessment must be resolved separately.
Which needle types are best for beginners?
Ask your trainer which equipment is required for an assigned machine exercise. These paper drills do not recommend needle groupings or settings.
How do I prevent shaky lines during long sessions?
Take breaks when needed and describe any difficulty to your instructor. Do not force practice through discomfort.
Final Thoughts & Next Steps
Use these exercises to make your drawing practice easier to discuss and review. They support a learning record; they do not replace practical instruction or establish readiness for client work.
Review the current online tattoo syllabus and ask how linework assignments are assessed. Check the actual feedback arrangements and completion criteria before choosing the course.
If you need local supervised experience, establish who will provide it and what activities it covers. Do not assume an online course includes a local placement or supplies all equipment.
Join Our Accredited Tattoo Course
Compare the current online tattoo course with your learning goals, then resolve questions about equipment, assignment review and practical preparation before enrolling.
Recent Blog Posts
 How to pause a consultation without losing claritySometimes the most useful outcome of a consultation is a clear next step rather than an immediate booking. A calm pause…
 Read product instructions before making a practice planA familiar product name does not tell you everything about its intended use. Product-specific questions belong at the start of planning,…
 Build a practice journal you will actually useA useful practice journal makes the next session easier to plan. It does not need to become a second project or…