Tattooing on Fake Skin: How to Practice as a Beginner
Learning Tattooing on Fake Skin is an essential, safe, and cost-effective step for beginners in the United Kingdom who want to build technical skill, speed, and confidence before working on real clients. Whether you’re training at home or enrolled in a formal course, deliberate practice on fake skin allows you to master needle control, shading, and line work without the pressure of live skin.
At Skinart United Kingdom we believe structured practice is the shortcut to consistent growth. This article — written by Gary Erskine, 25 years in body art education — walks you through what to buy, how to set up, common mistakes to avoid, and how to turn fake skin sessions into meaningful progress so you can move on to real clients safely and professionally.
Table of Contents
Use these links to jump to the section you need. We recommend bookmarking this page while you practice.
- Why practice on fake skin matters
- What you need to start (tools & setup)
- Key techniques to practise
- Pros and cons of fake skin practice
- Common mistakes beginners make
- A step-by-step progression plan
- How to assess your practice sessions
- Safety, hygiene and local UK guidance
- Frequently asked questions
- Final thoughts & next steps
Why practice on fake skin matters
Tattooing on Fake Skin gives beginners the chance to repeat core movements until they become second nature. For those in the United Kingdom, where apprenticeships and studio placements can be competitive, developing a strong portfolio of practice work shows commitment and technical ability to potential mentors and employers.
Fake skin reduces the fear of making irreversible mistakes on a live client, allowing you to focus on rhythm, depth control, machine movement, and the tactile feedback that comes from different needle groupings. Practising in a controlled environment also supports safe sterilisation habits — you can rehearse setting up a sterile tray, changing needles, and disposing of sharps responsibly.
Most importantly, deliberate practice on synthetic materials shortens the learning curve. You’ll be able to experiment with styles, shading gradients, and colour saturation in a way that’s impossible on someone else’s skin. That experience transfers directly to better client outcomes and fewer touch-ups when you begin tattooing people.
What you need to start (tools & setup)
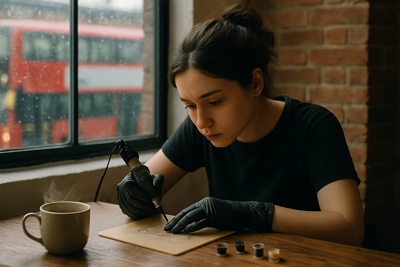
Before you begin Tattooing on Fake Skin, create a reliable practice station. You don’t need to be fully kitted like a studio, but you should replicate professional workflows as much as possible. A realistic setup accelerates muscle memory, making studio transitions smoother.
Pros and cons of practising on fake skin:
- Pros: Low risk, repeatability, economical and great for experimenting with new techniques.
- Cons: Tactile feedback differs from human skin; some learning remains once you move to live skin.
Follow the checklist below to make each session effective. Note: Skinart United Kingdom provides an online tattoo course but does not supply tattoo equipment for UK students — plan to source your own from reputable UK suppliers while adhering to local regulations.
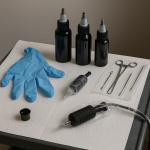
- Practice mat or dedicated table with an easy-to-clean surface
- Fake skin sheets (silicone or latex-based; test different brands)
- Tattoo machine (rotary or coil) and supply of disposable cartridges or needles
- Power supply and foot pedal
- Disposable gloves (nitrile), barrier film, and disinfectant wipes
- Ink appropriate for practice (use manufacturer guidance)
- Sharps container and clinical waste disposal plan
- Reference sketches, pencil and tracing paper for transfers
- Magnifier lamp and good daylight-balanced lighting
Key techniques to practise on fake skin
Not all practice is equal. Focused, short sessions with a single skill goal yield the best progress. Below are three short paragraphs explaining which core techniques to prioritise early in your practice.
Start with clean, crisp line work. Lines reveal problems with depth control, angle, and hand stability. On fake skin, practise single-line thicknesses, consistent curves, and steady rotation — treat each line as a small test you can repeat until consistent. Use simple shapes like circles and spirals to evaluate how your machine tracks.
Next, dedicate sessions to shading and gradients. Fake skin lets you explore needle groupings and speed without client pressure. Work from soft whip-shading to packed gradients; pay attention to how the ink sits in the material and how pass counts and speed affect darkness. This helps when translating to living skin, where tissue tension changes the outcome.
Finally, practise colour packing and saturation. Use small swatches and blocks of colour to learn how to fill consistently. Compare different inks, needle configurations, and passes. Over time, this will sharpen your eye for undertones and blending—skills that are vital when you transition away from synthetic practice.
- Line control: steady hand, consistent depth
- Needle angle: how a 45° vs 75° angle affects line and shading
- Speed & rhythm: hands vs machine movement
- Shading techniques: whip shading, circular motion, pendulum shading
- Gradients: smooth transition between dark and light
- Colour packing: saturation without blowout (on live skin)
- Needle grouping recognition: magnums, round liners, shaders
- Stencil placement & transfer consistency
Pros & Cons of Practising on Fake Skin
Choosing to learn Tattooing on Fake Skin is a responsible approach, but like any training method it has trade-offs. Understanding both sides helps you plan balanced practice sessions and prepare for eventual work on live clients.
- Pros
- Low physical risk — no live tissue damage.
- Highly repeatable for muscle memory.
- Cost-effective for trying techniques and inks.
- Convenient for home-based practice sessions.
- Great for building a portfolio of practice pieces.
- Cons
- Tactile feedback differs from human skin.
- Ink response is not identical to live tissue.
- Must be careful not to develop habits that rely on fake skin forgiveness.
To overcome the cons, integrate observational practice: study live tattoos (with permission), watch trusted studio videos, and ask mentors to critique your work. Skinart’s online Tattoo course in the United Kingdom pairs technical modules with live demonstration videos so you can see differences and know exactly what to look for when switching to people.
Remember, fake skin is a stepping stone. It’s an essential one, but not the final destination. Use it to refine fundamentals, then seek supervised live-skin experience when you and a studio mentor agree you’re ready.
Common mistakes and issues when practising on fake skin
- Using the wrong needle depth and assuming results reflect live skin.
- Practising for long hours without focused, measurable goals.
- Failing to simulate tissue tension — not stretching the fake skin correctly.
- Neglecting sterilisation workflows and treating practice sessions casually.
- Relying solely on fake skin and avoiding critique from professionals.
- Using poor-quality inks or materials and misattributing poor results to technique.
- Not photographing work properly for a progression portfolio.
- Skipping basic drawing and stencil-transfer practice, which leads to poor composition later.
Addressing these mistakes begins with planning: decide what a session will achieve, how you’ll measure success, and what corrective steps you’ll take. For example, record a short video of your hand positioning or take close-up photos of line work to track changes over time.
Where possible, arrange periodic reviews with an experienced tutor or mentor. At Skinart United Kingdom we encourage students to submit practice photos so a tutor can provide targeted feedback — something that accelerates learning more than hours alone.
A progression plan: from first lines to complex pieces
Structured progression turns random practice into measurable skill. Below is a suggested 12-week framework that focuses on repetition, feedback, and gradual complexity — ideal for beginners practising Tattooing on Fake Skin in the UK.
Weeks 1–2: Fundamentals — lines, circles, and simple stencils. Goal: consistent, unbroken lines with repeatable depth. Spend short, daily sessions of 30–45 minutes rather than marathon practices.
Weeks 3–6: Shading & gradients — simple shading techniques with limited colour. Add quality photos to your progress folder and compare daily. Seek critique from a tutor at least once during this block.
- Week 1: Hand position & line control exercises
- Week 2: Stencil transfers and warm-up sketches
- Week 3–4: Single-needle and shader practice
- Week 5: Colour packing basics and simple saturations
- Week 6: Small, complete flash pieces
- Week 7–8: Composition & negative space control
- Week 9–10: Larger pieces & multi-pass shading
- Week 11–12: Portfolio refinement and tutor review
How to assess your practice sessions
Assessment turns practice into progress. Keep a simple log with photos, the session goal, what needle grouping you used, speed setting, and a short note on improvements needed. Over time you’ll spot trends — for example, a consistent drag on one side that suggests posture issues.
Use these quality indicators after each session: line stability, consistent tonal transitions in shading, even colour packing, and clean stencils. Score each on a 1–5 scale and track averages week-to-week. This quantitative approach keeps emotion out of your review and highlights real improvement.
- Take photos at consistent angles and lighting
- Compare specimens side-by-side each week
- Request feedback from a qualified tutor or peer
- Note machine settings and needle sizes for reproducibility
- Record what felt uncomfortable and why
- Set one measurable goal for the next session
- Celebrate small wins — consistency beats perfection
- Keep a short voice note if typing feels slow
Safety, hygiene and UK guidance
Even when practising on fake skin, adopt real studio hygiene. Treat your practice area as if you were working on a client: wear gloves, use barrier film, change cartridges between sessions, and dispose of sharps safely. These habits are essential for when you begin tattooing on people.
In the United Kingdom, the Health and Safety Executive (HSE) emphasises safe sharps handling and infection-control principles that apply regardless of practice medium. For more detailed guidance on managing hazards and workplace safety, see the HSE (hse.gov.uk) which provides practical advice on blood-borne pathogens and safe waste disposal.
- Use a certified sharps bin for needle disposal
- Keep disinfectants and a clean surface between sessions
- Label and store inks and consumables safely
- Simulate client consent and aftercare conversations
- Ensure good ventilation and appropriate PPE
- If practicing in a shared space, inform household members
- Follow local council rules for commercial tattooing if you later open a studio
- Document your training and any health & safety courses you complete
Instructor insights & a council viewpoint
From the tutor’s chair: “Practising Tattooing on Fake Skin gives you the safe repetitions you need to gain control, but always seek external feedback. A tutor can point out subtle posture or angle issues you won’t see yourself,” says Gary Erskine, lead tutor at Skinart United Kingdom.
“Local environmental health officers routinely emphasise the importance of infection-control training. Even for practice sessions at home, adopt the same standards you would in a studio.” — Local Council Environmental Health Officer (paraphrased)
We include this perspective because many students underestimate the importance of formal Health & Safety training. Practising good habits now prevents costly mistakes later and prepares you for regulated work environments across the UK.
Success stories and UK examples
Many of our UK students began by practising Tattooing on Fake Skin and later secured placements in London, Manchester and Edinburgh studios. One former student began with basic line drills and within six months had built a portfolio of shaded pieces that impressed a studio owner during a placement interview.
Another student from Brighton used our progression plan to focus on gradients and colour packing. After a series of tutor reviews and a short supervised live-skin session, they were offered hourly paid shifts in a busy seaside studio — a direct result of consistent, guided practice.
- Student A — focused line work for 8 weeks, got accepted into an apprenticeship in Leeds
- Student B — colour practice, secured freelance guest spots in Brighton
- Student C — photographed progression and used images to be accepted for a London studio interview
How Skinart United Kingdom helps you progress
Our online Tattoo course is designed for students who want a structured curriculum to complement their practice on fake skin. The course covers essential topics — machine setup, needle types, shading, colour theory, and health & safety — all aligned with CPD and BAQA standards.
Because we deliver training online for the UK, students may practice at home without in-person sessions. We focus on visual learning, high-quality demonstration footage, and clear progression milestones so you know what to practise on your fake skin to get the most out of the course.
- CPD & BAQA accredited curriculum
- Step-by-step modules covering practical and theoretical skills
- Tutor feedback system using submitted practice photos
- Dedicated units on safety, client communication and aftercare
Frequently Asked Questions
Below are common questions beginners ask about Tattooing on Fake Skin, answered concisely to help you move forward.
Can practicing on fake skin replace live-skin experience?
No — fake skin is an indispensable preparation tool but cannot fully replicate living tissue. Use fake skin to master fundamentals and then seek supervised live-skin practice or studio placements when ready.
What type of fake skin is best for beginners?
Silicone-based sheets provide consistent feedback for line and shading practice. Try a few brands to find one that mimics the density you prefer; many beginners combine thin and thicker sheets to vary practice difficulty.
How often should I practice to see real improvement?
Short, focused daily sessions (30–60 minutes) with a single skill goal are more effective than occasional long sessions. Track progress with photos and tutor feedback for best results.
Is it safe to practice at home in the UK?
Yes, if you adopt studio-level hygiene: wear gloves, manage sharps correctly, and dispose of waste legally. Check local council guidance if you plan to run a commercial operation later.
Final thoughts: moving from practice to professional work
Tattooing on Fake Skin is the bridge between theory and live work. It’s safe, repeatable, and a proven route to accelerating foundational skills. But remember: translate your practice into real-world competence by seeking mentorship, documenting progress, and gradually introducing supervised live-skin sessions when appropriate.
You don’t need to wait to feel perfect — you need structured practice, critique, and the right training. Skinart United Kingdom’s online Tattoo course gives you a curriculum designed to convert your fake-skin hours into studio-ready skills. If you’re serious about developing a professional standard, follow the progression plan, get feedback, and take the next step.
Written by Gary Erskine, 25 years in body art education. If you’d like mentor-guided feedback on your practice portfolio, our online course includes direct tutor review and a pathway to accredited certification.
Ready to turn practice into progress?
Join our CPD and BAQA-accredited online Tattoo course to get structured lessons, video demos, and tutor feedback tailored to students in the United Kingdom.
Recent Blog Posts
- Studio Etiquette Update: Professionalism in 2026
 Workplace Etiquette for Body Art Studios Refresh your studio etiquette and build a reputation for professionalism with these up-to-date best practices.… Read More »Studio Etiquette Update: Professionalism in 2026
 - 🌙 Eid Mubarak: Celebrate with 5% Off in 2026!
 Eid Savings: 5% Off All Courses Celebrate Eid with a special offer: 5% off any course. Use code EID5 at checkout.… Read More »🌙 Eid Mubarak: Celebrate with 5% Off in 2026!
 - Top Mistakes New Body Artists Should Avoid (2026)
 Stay Ahead: Common Pitfalls for New Artists Read up on the most frequent errors new body artists make, and how to… Read More »Top Mistakes New Body Artists Should Avoid (2026)