Free tattoo design lesson
Tattoo shading practice: light, shadow and form
A smooth fade can still look flat. Learn to place your light and dark areas so a simple circle reads as a rounded shape, then use the same thinking to plan a tattoo design.
Start with pencil and paper. This lesson teaches value planning and visual judgement; it does not teach machine settings or working on skin. You will need a pencil, an eraser, paper and one round object to observe.
Give every shadow a reason
Value means how light or dark something appears. It is different from colour: a red and a green can have a similar value. Before thinking about a perfect blend, decide where the light comes from and which surfaces face away from it.
In the studies below, the light comes from the upper left. The sphere becomes darker towards the lower right. The shadow on the ground also falls away from that light. Keep this direction consistent instead of putting a dark edge around the whole circle.
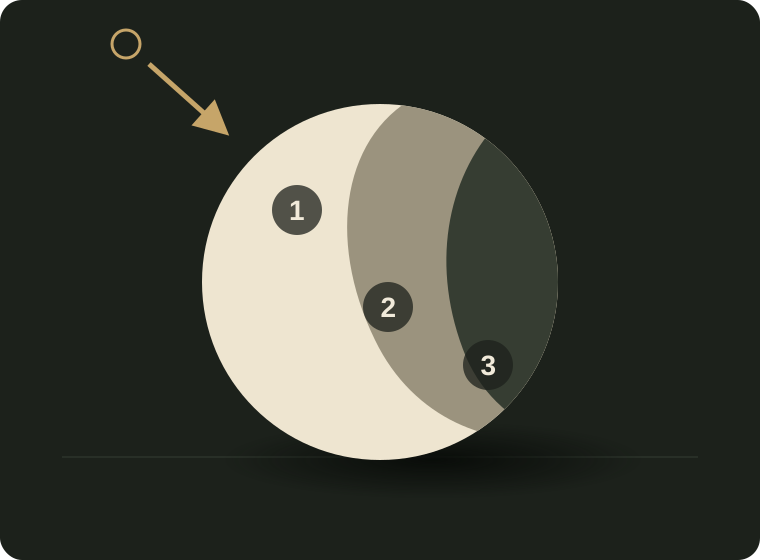
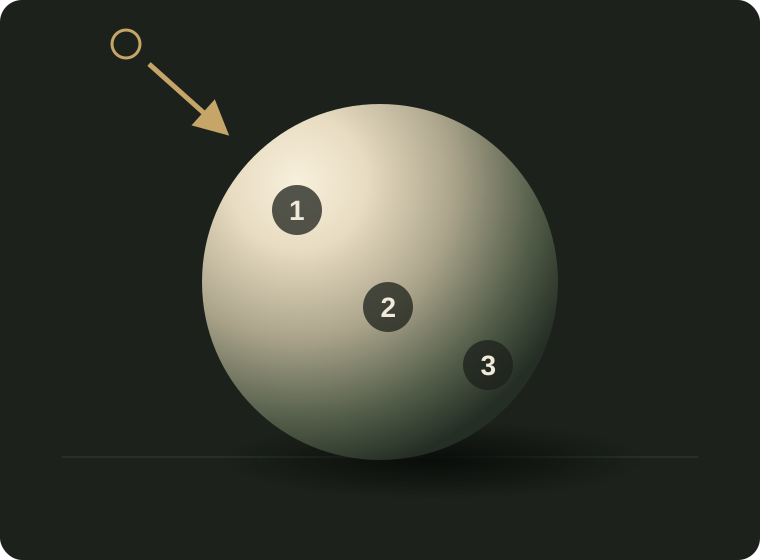
1 · LightKeep a clear light-facing area. The brightest part can be unmarked paper; you do not have to fill every space.
2 · MiddleUse the midtone to describe the turn of the form. Give it room instead of jumping straight from white to dark.
3 · DarkPlace the darker values where the form turns away from the light. Distinguish this form shadow from the shadow cast onto the ground.
Try it: one reference, two small studies
Place a plain round object beside a single light source. A simple ball is easier to read than a shiny object with several reflections. Keep your viewpoint and the light in the same position for both drawings.
Build the form before the finish
- Draw two circles at the same size. Beside them, draw an arrow showing the light direction. Use the same reference for both studies.
- Make a three-value plan in the first circle. Identify the light, middle and shadow areas. Leave your lightest area open and mark where the ground shadow falls. Look at the object rather than copying the diagram mechanically.
- Check the silhouette and the light. Does the dark side agree with the arrow? Can you still tell the light region from the middle region when you look from a little farther away?
- Draw a softer study in the second circle. Build your pencil tones gradually. Preserve the planned light and dark regions while making the transition between them less abrupt.
- Compare the two studies at their intended size. A polished surface is not the only goal. The second sphere should keep the readable form of the simpler value plan.
- Keep a record and change one thing next time. Photograph both drawings together with the light arrow visible. Note one specific change, such as a wider midtone or a clearer light region, before drawing a third study.
Download the free shading worksheet · A4 PDF
No sign-up needed. Use the value scale, fade and circle exercises alongside this lesson. Keep your attempts together with the practice comparison record.
Use the same idea in a tattoo design
A sphere is a study of form, not a shading recipe for every subject. In a petal, folded ribbon or butterfly wing, first identify the silhouette, the overlap and the spaces you want to keep open. Decide which part sits in front before placing its shadow on the form behind it.
Make a small value plan before adding fine detail. Two neighbouring shapes that are equally dark can merge; an open gap or a lighter region may separate them more clearly than another dark line. Check this at the size of the intended design, not only while zoomed in.
These decisions help in black-and-grey studies and in colour design. They also help you choose where a fine line needs breathing space. A detailed design does not need shading in every empty area.
Review the form, not just the smoothness
My fade is smooth, but the circle still looks flat. Why?
Check the arrangement of the values. If the same grey covers most of the circle, or the light and dark areas do not follow one light direction, smoothing the surface will not describe its shape. Return to the three-value plan before polishing the transition.
The highlight keeps disappearing. What should I change?
Mark the lightest region on your plan and leave that area alone while building the surrounding pencil tones. Compare it with the reference after each stage. Do not assume the answer is to make every other area darker.
My dark edge looks like a ring around the circle.
Check where the light-facing edge should stay light. A continuous dark ring can flatten the form. Separate the outline decision from the shading decision and use your observed light source to place the shadow.
Can I judge tattooing skill from this paper exercise?
No. It helps you practise value planning, observation and reviewing your work. Skin, synthetic practice material and paper behave differently. Follow the practical demonstrations in your training and seek tutor feedback; a good drawing or synthetic study alone does not establish readiness to tattoo a person.
Connect your practice to structured training
If drawing the outlines is the harder part, start with the free line-control practice sheet and return to this lesson afterwards. If you already follow the tattoo course, compare your synthetic practice with its value plan and bring a clear photograph and a specific question to your tutor.
Keep learning
Explore the tattoo course in your country
See the curriculum, learning requirements, tutor support and current Full Course or Part 1 options. The tattoo course includes fine line alongside its other tattoo styles and techniques.
Study basis: the butterfly shading and portrait assignments in the Skinart Tattoo Study Handbook. This original paper exercise develops the handbook’s principles of value planning, keeping highlights open and comparing practice with a reference. It is a free introduction, not a replacement for the course’s practical instruction.