Healing Timeline: What Happens After Microblading?
Curious about the Healing Timeline After Microblading and exactly what happens to your brows each day and week? Whether you’ve just had your appointment or you’re planning ahead, understanding the stages helps you avoid panic, protect your results, and enjoy beautifully healed brows.
In this Australia-focused guide from Skinart Australia, we’ll walk through the complete post-treatment journey — from initial redness and scabbing to colour softening and your all-important touch-up. You’ll learn what’s normal, what needs attention, and how to care for your skin in Australia’s varied climates so your brows heal safely and predictably.
Written by Gary Erskine — Lead Educator at Skinart Australia, CPD Standards Office and BAQA accredited. Gary has over 25 years of industry experience and has trained thousands of students worldwide in microblading and permanent makeup best practice.
Table of Contents
Use the anchor links below to jump to the stage you care about. Clear, semantic IDs help Google create “Jump to” results so you can find answers fast.
- Understanding the Healing Timeline After Microblading
- Week 1: Day-by-Day — Redness, Tenderness, and First Flakes
- Weeks 2–6: Colour Softening, Patchiness, and Settling
- Common Mistakes That Delay Healing
- Aftercare Essentials for the Australian Climate
- What’s Normal vs What’s a Problem
- Your Touch-Up and Long-Term Maintenance
- FAQs: Healing Timeline After Microblading
- Final Thoughts
- Train Online with Skinart Australia
Understanding the Healing Timeline After Microblading
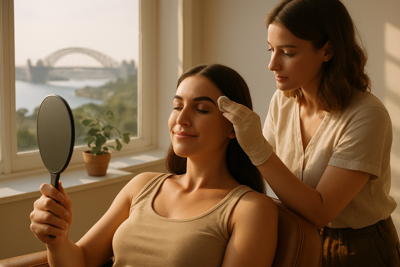
The Healing Timeline After Microblading isn’t guesswork — it’s a predictable sequence of skin responses. Microblading creates fine, superficial strokes in the epidermis, depositing pigment so the brows appear fuller and better shaped. Because the technique sits close to the surface, the body heals relatively quickly compared with deeper tattooing, yet those early days still require care to preserve crisp, hair-like strokes.
Immediately after your session, brows usually look darker and more defined than the final result. Over the next 7–10 days, a thin micro-scab forms and naturally flakes off. During this period you may see mild redness, tightness, itchiness, and a bit of flaking — all normal parts of the Healing Timeline After Microblading. Once the initial scabbing phase finishes, colour appears lighter, even “too light,” before it blooms again as the skin fully settles.
By 4–6 weeks, the skin has completed a full regeneration cycle. Any patchiness present in Weeks 2–4 becomes a useful map for your touch-up, where your artist reinforces faded strokes and fine-tunes shape and density. This is why understanding the Healing Timeline After Microblading helps you stay calm, prevent avoidable mistakes, and schedule your touch-up for optimal results.
Week 1: Day-by-Day — Redness, Tenderness, and First Flakes
Right after treatment, the brows can appear bold, about 20–40% darker than the healed result. Over the first seven days, the skin forms a protective micro-scab that keeps pigment in place while the epidermis repairs. As the scab loosens, you’ll notice flaking — this is expected and short-lived. Below is a quick overview of Week 1’s pros and cons to help you navigate the most sensitive stage of the Healing Timeline After Microblading.
- Pros – The shape is set, early colour looks crisp, and mild tightness is a sign your skin is sealing and protecting the pigment.
- Pros – Any redness usually settles within 24–72 hours, particularly if you keep the area clean, dry, and protected from sun exposure.
- Pros – Most clients can resume desk work the same or next day with minimal downtime.
- Cons – Visible flaking between Days 3–7 can look uneven; picking or rubbing can pull pigment out and cause patchiness.
- Cons – Sweating and steam (hot yoga, saunas, long hot showers) can soften the scab too quickly and blur strokes.
- Cons – Sun, ocean swims, and chlorinated pools can irritate the area and compromise healing, especially in the Australian summer.
Day-by-day, expect brows to feel a little tight first, then itchy as the micro-scab dries. Around Days 3–5, small flakes appear; resist the urge to touch them. By Days 6–7, most flaking has finished, and the brows may look “too light.” Don’t worry — this is normal. You’re seeing new skin over the pigment, and colour clarity returns over the next couple of weeks.
If you work outdoors in Australia’s heat or coastal wind, plan ahead. Wear a hat, avoid direct sun on the brow area, and shield the brows from sweat or sea spray during Week 1. This small discipline pays off with sharper strokes and more even retention as your Healing Timeline After Microblading progresses.
Weeks 2–6: Colour Softening, Patchiness, and Settling
After flaking stops, many clients notice the colour has lightened significantly. This is sometimes called the “ghosting” phase. The skin continues to heal beneath the surface, and as the new tissue matures, the pigment reappears with a softer, more natural tone. This period is the heart of the Healing Timeline After Microblading and explains why your touch-up happens later, not immediately after flaking ends.
You may observe slight patchiness where your skin shed micro-scabs faster in certain areas. Oily skin types may also see strokes blur slightly compared with dry or normal skin. Don’t be alarmed — this data is useful. Your touch-up appointment is precisely where your artist reintroduces strokes that healed lighter, adjusts symmetry, and refines colour temperature for your skin.
By Weeks 4–6, the majority of clients have reached a stable result. If you’re in a high-UV environment — common across Queensland, Western Australia, and the Northern Territory — consistent SPF around, not on, the brow area and brimmed hats are incredibly helpful in protecting your new brows as they settle.
- Brows look lighter post-flaking, then gradually regain clarity.
- Patchiness is expected and guides strategic touch-up placement.
- Oily skin types may experience softer stroke edges; this is normal.
- New skin can look slightly shiny before it fully matures.
- Mild itchiness can return as the tissue remodels; avoid scratching.
- UV exposure can prematurely fade pigment; use shade and hats.
- Exercise is easier now, but rinse sweat from the brow area promptly.
- Brow cosmetics are generally fine again after Week 2 if advised by your artist.
- Keep your follow-up booked for 4–8 weeks to complete the process.
Common Mistakes That Delay Healing
- Picking flakes before they naturally detach.
- Sweating heavily in the first week (hot yoga, long runs, saunas).
- Swimming in ocean or pools during the initial scabbing stage.
- Sleeping face-down and rubbing brows against bedding.
- Over-applying aftercare balm and suffocating the skin.
- Using active skincare (retinol, acids) too close to the brow area.
- Sunbathing or skipping hats in high-UV conditions.
- Wearing heavy makeup over healing skin.
- Not washing hands before touching the brow area.
- Ignoring signs of irritation or using harsh cleansers.
Most healing issues stem from friction, moisture, and contamination. Your goal is to keep the area clean, dry, and undisturbed while the micro-scab forms and naturally sheds. Australia’s warm climate can make sweating hard to avoid, so adjust your routine: keep workouts gentle and short, shower cool, and pat skin dry instead of rubbing.
If you accidentally knock off a flake early, don’t panic. Continue your aftercare, avoid further disturbance, and allow the area to settle. Patchy spots are typically corrected at the touch-up, which is built into the Healing Timeline After Microblading to refine your final result.
Aftercare Essentials for the Australian Climate
Australia’s UV index is among the highest in the world. UV exposure can accelerate fading and irritate healing skin. During Week 1, protect the area with physical barriers (brimmed hats, sunglasses) and avoid direct sun. Once healed, use SPF around the brow region and keep those hats handy — prevention is easier than correction.
Humidity on the coast, dry heat inland, and seasonal extremes can all influence your Healing Timeline After Microblading. Aim for balance: keep skin clean but not soaked; moisturised but not greasy. Follow your artist’s aftercare plan and adjust slightly for your environment — shorter showers in the tropics, a touch more lightweight balm in dry inland conditions.
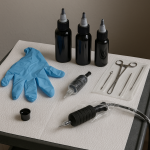
Local compliance matters too. In Australia, microblading falls under “skin penetration” procedures, which come with infection-control obligations. If you’re curious, state health sites explain responsibilities for practitioners and premises. These safeguards exist to support safe procedures and predictable healing outcomes for clients.
- Wear wide-brim hats in summer; avoid direct sun on brows during Week 1.
- Keep workouts light; pat sweat away gently if it occurs.
- Cool, short showers; avoid steam until flaking completes.
- Use a thin layer of the recommended aftercare balm only as directed.
- Do not apply active skincare near the brows until fully healed.
- Use SPF around the area once healed to help reduce fading.
- Rinse saltwater or chlorine from surrounding skin promptly once fully healed.
- Follow state health guidance and your artist’s instructions for best results.
What’s Normal vs What’s a Problem
Normal healing includes mild redness for 24–72 hours, tightness, light swelling, and flaking that starts around Days 3–5. The brows may look darker at first, then lighter after flaking before colour softens to its intended tone. Itchiness is common; pain should be minimal after the first day or two.
Concerning signs include escalating redness after Day 3, pronounced swelling, warmth, pus-like discharge, or increasing pain. If any of these occur, stop applying balm, keep the area clean, and contact your artist or a healthcare professional. In Australia, your GP can advise promptly and refer you if needed. When in doubt, get help early — it protects your result and your health.
Here’s expert guidance from Gary Erskine, our lead educator at Skinart Australia:
“The best results come from light, consistent care — keeping brows clean, dry, and protected, while resisting the urge to touch them. If something looks off or feels hot, don’t wait. Reach out to your artist or GP so the Healing Timeline After Microblading stays on track.”
Gary Erskine, Skinart Australia
- Normal: Mild redness, itchiness, tightness, light flaking.
- Normal: Brows look dark, then too light, then soften.
- Normal: Slight patchiness until touch-up.
- Seek advice: Spreading redness, heat, or discharge.
- Seek advice: Persistent or increasing pain after Day 2–3.
- Seek advice: Sudden rash or signs of allergic reaction.
Your Touch-Up and Long-Term Maintenance
The touch-up is where microblading truly matures. Scheduled around 4–8 weeks, it fills in lighter areas, adjusts curvature and colour temperature, and strengthens density where needed. Think of your first appointment as “drafting” and your touch-up as “editing.” Together they produce natural, enduring brows aligned with your skin and lifestyle.
For long-term maintenance, be mindful of UV exposure and active skincare ingredients that accelerate cell turnover. Use SPF around the brow region after healing, and minimise regular use of retinols and acids that overlap the brow. If you’re especially outdoorsy — surfers, runners, gardeners — a hat is one of the most protective habits you can build.
If you’re a practitioner or considering training, Australia’s state health departments outline the standards for skin penetration procedures, hygiene, and premises requirements. For client safety and consistent Healing Timelines After Microblading, it’s worth reviewing guidance from your state, such as NSW Health or Queensland’s Personal Appearance Services.
FAQs: Healing Timeline After Microblading
How long does microblading take to heal fully?
Most clients consider brows “healed enough” for normal life by 10–14 days, after the flaking phase passes. However, the skin continues maturing under the surface for 4–6 weeks, which is why your touch-up is scheduled later to complete the Healing Timeline After Microblading.
Is it normal for brows to look too light after scabbing?
Yes. The “too light” phase is common. As the new skin settles, colour clarity returns and softens into a natural tone. Your touch-up reinforces any areas that healed lighter than expected.
Can I exercise during the first week?
Light movement is fine, but avoid heavy sweating, steam rooms, hot yoga, and long runs until flaking is complete. Sweat can soften scabs prematurely and reduce pigment retention.
When can I go swimming after microblading?
Avoid swimming during Week 1 and until flaking has naturally finished. Salt and chlorine can irritate the area and increase the chance of patchiness or blurred strokes.
What if my brows feel itchy — should I use more balm?
A little itch is normal and a sign the skin is repairing. Use aftercare balm only as directed by your artist; over-application can suffocate healing tissue. If itch escalates or rash appears, stop applying products and contact your artist or GP.
Do I need a touch-up if I like the result after two weeks?
Yes — microblading is typically a two-appointment process. The touch-up aligns both brows, fills lighter gaps, and ensures your results last. Skipping it often leads to uneven fading.
Final Thoughts: Trust the Process and Protect Your Investment
The Healing Timeline After Microblading is designed around your body’s natural repair cycle. Expect early boldness, mid-stage lightness, and a soft, natural finish by Week 4–6. Touch-up completes the process, ensuring both brows settle evenly and last with graceful fading over time.
You don’t have to micromanage healing — just follow simple aftercare, protect the area from sweat and sun, and avoid picking. If something worries you, ask your artist or GP for guidance. Thousands of Australians safely enjoy microbladed brows every year because they trust the process and look after their skin during the first two weeks.
If you’re ready to turn your interest into a profession, Skinart Australia can help you master techniques, client communication, and aftercare coaching so your clients’ Healing Timelines After Microblading are smooth and predictable.
Skinart Australia Online Microblading Course
Train with an internationally recognised provider trusted across Australia. Skinart Australia’s online Microblading program is fully accredited by the CPD Standards Office and the Body Art Qualification Association (BAQA). Led by Gary Erskine, who has over 25 years’ experience, our curriculum blends technique, hygiene, client communication, and aftercare mastery — everything you need to guide clients through a smooth Healing Timeline After Microblading.
Please note: We do not offer in-person microblading training in Australia, and we do not supply microblading equipment locally. Our program focuses on world-class, online training and assessment so you can study from anywhere.
Recent Blog Posts
- 🌙 Eid Mubarak: Celebrate with 5% Off in 2026!
 Eid Savings: 5% Off All Courses Celebrate Eid with a special offer: 5% off any course. Use code EID5 at checkout.… Read More »🌙 Eid Mubarak: Celebrate with 5% Off in 2026!
 - Top Mistakes New Body Artists Should Avoid (2026)
 Stay Ahead: Common Pitfalls for New Artists Read up on the most frequent errors new body artists make, and how to… Read More »Top Mistakes New Body Artists Should Avoid (2026)
 - Client Communication Skills: 2026 Body Art Success
 Master Consultation for Better Results Top communication strategies for client satisfaction and better outcomes in 2026 and beyond. X Send Chat