How to Practice Microblading at Home (Without a Client)

Learning how to Practice Microblading at Home is a practical and effective way to build muscle memory, refine strokes and grow confidence before working with live clients. Whether you’re based in Sydney, Melbourne or a regional town in Australia, structured practice at home will accelerate your technical progress.
In this guide we’ll walk you through safe, professional, and accreditation-friendly ways to practise microblading without a live client — from choosing realistic practice skins through to building a practice routine, avoiding common mistakes and tracking progress. The advice here is tailored to Australian rules and the standards expected by CPD and BAQA-accredited training.
Written by Gary Erskine, 25 years’ experience in microblading education, this article is designed to supplement accredited learning and encourage a clear path to accreditation with Skinart Australia.
Table of Contents
Use these anchor links to jump to the section you need. These semantic IDs help search engines generate “Jump to” links in results too.
- Why Practice Microblading at Home?
- Pros and Cons of Practising Without a Client
- Essential Tools & Supplies for Home Practice
- A Step-by-Step Practice Routine
- Hygiene, Safety & Australian Regulations
- Tracking Progress & Building a Portfolio
- Common Practice Mistakes to Avoid
- FAQs — Practicing Microblading at Home
- Final Thoughts & Next Steps
Why Practice Microblading at Home?
Practising microblading at home gives you repeated, low-pressure opportunities to improve core technical skills without a live client. At Skinart Australia we recommend deliberate, planned practice as a bridge between theory (what you learn in class or online) and live work. Early practice sessions should focus on lines, control, pressure and consistency rather than colour retention or skin healing.
When you practice at home, you can schedule short focused sessions — 20 to 45 minutes — several times a week. This frequency is far more effective than occasional long marathons. The key is to practice with intention: set a skill to improve, repeat it until comfortable, then move on to the next skill.
Importantly, practising at home helps you build a visual portfolio you can show to assessors and clients. Even though you’re not using a live client, a well-documented practice progression demonstrates commitment, skill development, and readiness for accreditation.
Pros and Cons of Practising Without a Client
Practising microblading at home is an essential, practical step for most trainees and early-career artists. It’s not a substitute for supervised, accredited training or real-client experience, but it is a safe and efficient way to sharpen technique. Below are easy-to-scan pros and cons to help you decide how to structure your at-home practice.
- Pros: Low pressure environment; repeatable drills; inexpensive practice with synthetic skins; develop consistent strokes and brow mapping skills.
- Cons: Synthetic skins and volunteers differ from live skin; cannot replicate client reaction, bleeding, or real-time healing; limited feedback unless reviewed by a tutor or peer.
To reduce the cons, incorporate tutor feedback whenever possible. For Skinart Australia online course students, submitting practice progress photos for feedback is a recommended step — it bridges the gap between solo practice and live client work.
Remember: practicing microblading at home is about quality over quantity. A focused hour of repeated micro-strokes is more valuable than a scattergun session attempting every technique at once.
Essential Tools & Supplies for Home Practice
Although Skinart Australia does not supply microblading equipment in Australia, you can assemble a responsible, safe practice kit from reliable suppliers. Choose disposable items where possible and ensure everything you use is single-use or cleaned according to Australian infection-control principles.
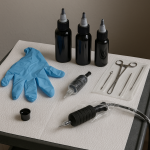
Below is a practical checklist for home practice. These items will help you create a realistic simulation while supporting safe technique development.
- Practice skins (silicone skin pads) in a variety of tones and thicknesses
- Microblading handles and disposable blades (ensure reputable brands and compliant disposables)
- Pigment test pads (for practicing colour loading on synthetic surfaces)
- Disposable gloves (nitrile), face mask and protective eyewear
- Pre-cut brow stencils and flexible ruler / caliper for mapping
- Disposable micro swabs, sterile water, and pigment cups (single-use)
- Practice mannequin head or clamp to hold skin at realistic angles
- Good lighting (daylight lamp) and a loupe or magnification for detail work
- Camera or smartphone tripod for consistent before/after photos
- Notepad or digital log to track practice sessions and reflections
- Sharps container (for used blades) and appropriate biohazard waste disposal planning
Quality practice skins vary between manufacturers, so try a few. Australian trainees commonly source silicone skins made for PMU practice that mimic the resistance of human skin. Always dispose of blades and any single-use items responsibly in accordance with state health regulations.
Practice Microblading at Home using these tools helps you build repeatable habits. Keep in mind the tactile difference to real skin — use every opportunity to compare your strokes on different materials.
A Step-by-Step Practice Routine
Structured practice routines build skill faster than random attempts. Below is a progressive, repeatable sequence to use when you Practice Microblading at Home. Plan your session, warm up, do concentrated drilling, and finish with a review and documentation step.
- Warm up: 5–10 minutes of freehand lines on paper to set hand rhythm and pressure.
- Mapping practice: 10–15 minutes of brow mapping on paper and on silicone skins using calipers and rulers.
- Stroke drills: 15–30 minutes focusing on hair-stroke length, tapering and direction on practice skin.
- Speed & pressure: 10 minutes alternating shallow vs slightly deeper strokes to understand blade engagement.
- Composite practice: combine mapping + strokes to create a full brow on a practice skin.
- Documentation: take consistent before and after photos, label them with dates and focus points.
- Reflection: write one short note on what improved and what to target next session.
Start each week with a clear goal (for example: “Improve inner-head strokes” or “Achieve consistent stroke length at 1.5 mm”). Keep sessions short and focused. Repeating a single micro-skill repeatedly will deliver faster, more measurable improvements than long unfocused practice sessions.
When you can, share your practice photos with an accredited tutor or a peer review group. External feedback shortens the learning curve and highlights habits you can’t see in the mirror of your own work.
Common Practice Mistakes and How to Fix Them
- Overworking practice skins until they tear — stop when strokes look consistent rather than trying to “perfect” every area.
- Ignoring consistent photography — inconsistent angles make progress hard to judge.
- Using dull blades — replace blades frequently during practice to maintain realistic cutting action.
- Neglecting mapping — skipping mapping drills leads to uneven symmetry when you move to full brows.
- Practising in one position only — train at different angles to replicate how clients sit in a chair.
- Not logging sessions — you can’t measure progress without a simple training log.
- Comparing yourself unfairly — individual learning curves vary; use your own previous work as the benchmark.
- Skipping hygiene steps because you’re “not on a client” — this creates bad habits; always set up as if you will see a client.
- Not seeking feedback — solo practice without critique slows development.
- Relying solely on synthetic skins — occasionally observe supervised live procedures or clinical videos to understand tissue response.
Address each mistake by adding one corrective habit at a time. For example, pair every practice session with a mandatory five-minute photo step and a quick line in your log. If you can’t get tutor feedback regularly, consider a monthly peer review session online with a small group of trusted trainees.
Microblading is both an artistic and manual skill. Persistent errors usually come down to habit — change the habit with deliberate practice, not by trying to fix everything in one session.
Hygiene, Safety & Australian Regulations
Practising microblading at home does not exempt you from hygiene responsibilities. Even though you’re working on practice skins, you should adopt the same infection-control mindset used in a professional studio. This prevents the formation of unsafe shortcuts that could later compromise client safety.
Compliance in Australia is ultimately regulated at the state and territory level. Key expectations include proper disposal of sharps, safe handling of pigments and single-use disposables, and appropriate use of personal protective equipment (PPE). For accurate, region-specific requirements check your local council or state health department guidance.
Here’s an industry quote that reinforces the standard of care we expect at Skinart:
“Practise hygiene protocols as if you have a client in the chair. Repetition of safe setups during training encourages consistent professional behaviour later.” — CPD Standards Office statement on practical training best practice.
- Always wear nitrile gloves and a mask when handling blades and pigments.
- Use single-use blades and pigment cups — dispose of them in an approved sharps container.
- Keep a clean, dedicated practice surface; wipe down with approved disinfectant between sessions.
- Document your waste disposal and storage of supplies if you plan to progress to a professional studio.
If you plan to transition to offering services, ensure you complete the Skinart-accredited microblading course in Australia and consult your local council about registration and inspection requirements. For the most robust compliance information, consult your state health authority site (for example, NSW Health or Victorian DHHS).
Tracking Progress & Building a Portfolio
Practising microblading at home becomes exponentially more valuable when paired with consistent documentation. Build a digital portfolio of practice photos and notes that show your growth over time — assessors and potential clients like to see a clear learning trajectory.
Use consistent photography: same lighting, same angle, same distance, and the same device. Add short captions that describe the practice focus (e.g., “Week 3: inner hair tapering, 1.2 mm strokes”) and the date. Over weeks and months these images will reveal measurable improvement.
- Before/after photos with date and session goal
- Close-up macro shots of stroke detail
- Wide shots to show entire brow symmetry
- Short notes on what was practiced and what changed
- Ratings (1–5) on confidence in each skill area
- Moodboard of preferred shapes and styles
- Samples of mapping templates used
- Feedback snippets from tutors or peers
In Australia, many assessing bodies and clients appreciate a clear learning record. A good portfolio doesn’t need to be perfect work; it needs to show progression, rigour and reflective learning. This is an asset when you apply for accreditation or take further advanced training.
Getting Feedback & When to Move to Live Clients
One of the most important parts of practising microblading at home is knowing when your skill level is ready for supervised live practice. Feedback from accredited tutors is the gold standard. For Skinart Australia students, structured photo submission and tutor review help determine readiness.
Arrange regular reviews — weekly or fortnightly — with a tutor or peer reviewer. They will look for stroke consistency, mapping accuracy, natural shape, and adherence to hygiene protocols. When these consistently meet assessment criteria on practice skins, you can progress under supervised, controlled conditions.
- Schedule regular tutor reviews of your practice portfolio
- Use video calls to demonstrate technique and posture
- Compare your work against accredited standard images
- Ask for specific corrective actions rather than general comments
Progression to live clients is a staged process. Always prioritise supervised experience and client safety. In Australia, this often means working under a mentor or in a clinic atmosphere after course completion and successful portfolio review.
Industry Insights & Australian Success Stories
In Australia, many successful artists began by practising microblading at home, then sought accreditation and supervised hours. For example, a recent Skinart Australia graduate from Brisbane logged regular weekly practice on silicone skins, documented progress with date-stamped photos, then passed practical assessment after 4 months of disciplined practice and tutor feedback.
Local councils in Australia increasingly require clear evidence of training and safe practice before permits are granted. Trainees who maintain a methodical practice log, follow infection control, and undertake CPD-accredited courses find the process of registration much smoother.
At Skinart, our students often tell us that the single most valuable habit was a short daily practice and a weekly review with a tutor. This is a pattern you can adopt in any Australian city or regional centre.
Frequently Asked Questions
Common questions trainees ask about how to Practice Microblading at Home are answered below. Each answer is concise and practical.
Can I learn microblading only by practising at home?
Home practice is an essential complement to accredited learning, but it should not replace formal training. Accredited courses provide critical knowledge in colour theory, skin anatomy and infection control that practice alone cannot deliver.
How often should I practice microblading at home?
Short, frequent sessions are best — aim for 3–5 sessions a week of 20–45 minutes focused on specific skills. Consistency matters more than length of each session.
What practice skins should I buy to simulate Australian skin types?
Choose silicone skins in a variety of tones and thicknesses. Look for higher-grade practice skins that mimic the density of mature skin if you want a realistic challenge; try at least two different types to understand how stroke depth and pressure vary.
Do I need to follow studio hygiene rules while practicing at home?
Yes. Practising with studio-level hygiene is a core habit you must develop. Always use gloves, single-use blades, and dispose of sharps properly — this prepares you for professional work and protects you from bad habits.
When should I progress from practice skins to working on a real client?
Progression should be based on consistent tutor feedback, documented improvement and demonstrated hygiene competence. After your tutor signs off and you have completed the Skinart Australia accreditation requirements, supervised live practice is the next step.
Final Thoughts & Next Steps
Practising microblading at home is a practical, evidence-based way to improve your technique, provided you follow safe, accredited pathways. Use structured routines, document progress and seek tutor feedback. These three habits multiply the value of your practice time.
If you’re in Australia and serious about becoming a professional microblading artist, combine home practice with accredited training. Skinart Australia’s online microblading course is CPD and BAQA-aligned and designed to prepare you for accreditation and safe studio practice.
Stay consistent, be patient with your progress, and when you’re ready, take the next step to supervised practice and professional accreditation. You’ll be surprised how quickly focused practice converts into a confident, commercial-ready skillset.
Ready to Progress Beyond Home Practice?
Join Skinart Australia’s accredited online microblading course to combine home practice with structured learning, tutor feedback and a pathway to BAQA-recognised accreditation.
Recent Blog Posts
- 🌙 Eid Mubarak: Celebrate with 5% Off in 2026!
 Eid Savings: 5% Off All Courses Celebrate Eid with a special offer: 5% off any course. Use code EID5 at checkout.… Read More »🌙 Eid Mubarak: Celebrate with 5% Off in 2026!
 - Top Mistakes New Body Artists Should Avoid (2026)
 Stay Ahead: Common Pitfalls for New Artists Read up on the most frequent errors new body artists make, and how to… Read More »Top Mistakes New Body Artists Should Avoid (2026)
 - Client Communication Skills: 2026 Body Art Success
 Master Consultation for Better Results Top communication strategies for client satisfaction and better outcomes in 2026 and beyond. X Send Chat