Step-by-Step Microblading Procedure for Beginners

Welcome to a practical, safety-first walkthrough designed especially for new artists working in Australia. This Step-by-Step Microblading Procedure guide breaks down the full session — from consultation and preparation to aftercare — so you can start building confidence while meeting local standards. The focus keyword of this page, Step-by-Step Microblading Procedure, will guide the structure and ensure you can quickly jump to the parts you need.
Microblading is a precise, semi-permanent technique that delivers natural-looking eyebrow hair strokes. For beginners, understanding the process in a methodical way reduces risk, improves client outcomes and fast-tracks your professional development. This article complements Skinart Australia’s accredited online Microblading course and gives actionable steps you can apply in a clinical setting.
Written by Gary Erskine, 25 years in Step-by-Step Microblading Procedure education and training thousands of artists worldwide, this guide is grounded in best practice and current Australian health guidance. If you’re ready to learn the practical workflow and the common pitfalls to avoid, read on — and consider joining our fully accredited course to gain CPD and BAQA recognised certification.
Table of Contents
Use these links to jump to the section you need. Anchored headings help Google and improve navigation on mobile.
Introduction to the Step-by-Step Microblading Procedure
Microblading is an artist-led procedure that deposits pigment into the superficial dermis to create hair-like strokes. The Step-by-Step Microblading Procedure is more than just the needlework — it encompasses consultation, mapping, anaesthetic management, the actual microblading technique, hygiene, and detailed aftercare instructions. A systematic approach improves both client safety and cosmetic results.
As a beginner, think of the procedure as a checklist of interdependent tasks. Each one builds on the last: a careful medical-screening at the start reduces complications later; clean setup prevents infection; precise mapping ensures symmetry. We’ll explain each step below with Australian examples and regulatory context so you can practise with clarity.
Remember: a clear Step-by-Step Microblading Procedure protects both you and your client. Following an accredited course, like the Skinart online Microblading course, gives you the practical knowledge and recognised qualification required to operate professionally in Australia under recognised standards such as CPD and BAQA.
Legalities, Accreditation & Client Safety
Before you start any Step-by-Step Microblading Procedure in Australia, ensure you meet the legal and public health requirements. Accreditation through recognised bodies such as the CPD Standards Office and the Body Art Qualification Association (BAQA) demonstrates that your training meets national expectations for safety, infection control, and professional conduct.
- Pros: Accredited training improves client trust, aligns you with industry standards, and supports insurance applications.
- Cons: Initial cost and time investment — but these are essential to reduce risk and build a sustainable career.
At Skinart Australia we deliver a comprehensive online Microblading course that is CPD and BAQA aligned, making it easier for graduates to demonstrate competency. While we do not offer in-person Microblading training in Australia, our online format combines video demonstrations, downloadable manuals and tutor support to prepare you for clinical practice.
Practical safety also means local compliance: check your municipal council’s health unit requirements for skin penetration services and maintain clear client records, informed consent documents and a robust infection control protocol. For further guidance on CPD recognition visit the CPD Standards Office website and for industry standards see BAQA’s site.
Preparation, Tools & Setup
Preparation is the backbone of a reliable Step-by-Step Microblading Procedure. Proper setup reduces the risk of contamination, improves workflow and makes the actual microblading strokes more predictable. Workstation organisation should be patient-focused and ergonomically set up to protect both you and the client.
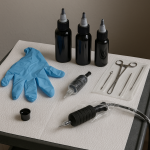
Key workspace considerations include lighting, a comfortable chair with head support, waste management, sharps containers, alcohol swabs, single-use microblading blades (where permitted), pigment palettes, and sterile gloves. Note: Skinart Australia does not supply Microblading equipment in Australia; you will need to source tools from regulated suppliers that conform to Australian safety expectations.
Hygiene supplies and paperwork are equally important. Keep pre-filled consent forms, medical history checklists, allergy screening questions, and aftercare instructions ready. An uninterrupted, clean workflow is essential — set up everything before the client arrives so you can maintain aseptic technique during the procedure.
- Adjustable treatment chair or bed for client comfort
- Strong daylight or LED task lighting
- Disposable microblading cartridges or blades (single-use)
- Pigments suited for Fitzpatrick skin types common in Australia
- Measuring tools: calipers, ruler, and brow mapping strings
- Topical anaesthetic (as permitted, with local regulations)
- Antiseptics and alcohol wipes
- Sharps disposal and clinical waste bins
- Disposable gloves, masks, and barrier film
- Client consent forms and digital aftercare PDF ready to send
Step-by-Step Procedure — The Practical Workflow
The Step-by-Step Microblading Procedure can be broken down into discrete phases. Each phase requires attention to detail and a calm, methodical approach. Below we outline a reliable workflow you can adopt as a beginner.
We include the microblading workflow itself plus notes on client communication and progress checks. The sequence helps you manage time and keep client confidence high.
Follow this sequence on every client to ensure consistency and safe outcomes:
- 1. Pre-screening & consultation — review medical history, medications (blood thinners), pregnancy, previous cosmetic procedures, allergies (including lidocaine), and client expectations.
- 2. Patch test (where required) — some clinics include a small pigment patch test for clients with suspected sensitivities.
- 3. Consent & mapping — measure facial proportions, draw the brow shape using mapping string, brow pencils or calipers; confirm shape with the client.
- 4. Cleanse & disinfect — cleanse treatment area with recommended antiseptic solutions, remove makeup and oils.
- 5. Numbing — apply topical anaesthetic per product guidelines and local regulations; document concentration and amount used.
- 6. Pigment selection — choose pigment shade based on skin tone, Fitzpatrick scale, and client preference; mix on a sterile palette.
- 7. Microblading strokes — use correct blade angle and pressure to create hair-like strokes that mimic natural brow hair direction; constantly wipe to assess pigment deposit.
- 8. Pigment saturation pass — depending on skin type, a second light pass may be required for even saturation; avoid overworking the skin.
- 9. Clean & evaluate symmetry — compare both brows, make minor adjustments if necessary while the skin is still receptive.
- 10. Apply protective barrier — finish with a healing balm or barrier film and give detailed aftercare instructions.
- 11. Documentation & booking — record pigments, blades, anaesthetics used, and book a scheduled 6–12 week touch-up if required.
Common Mistakes & Issues Beginners Make
- 1. Poor mapping leading to asymmetry
- 2. Choosing pigment that’s too warm or too dark
- 3. Overworking the skin (too many passes)
- 4. Incorrect blade angle causing ink blowout or scarring
- 5. Not screening for contraindications (e.g., isotretinoin)
- 6. Inadequate lighting and poor visibility of hair direction
- 7. Failing to document materials and client information
- 8. Rushing the procedure and neglecting client comfort
- 9. Using non-sterile technique or reusing disposables
- 10. Not scheduling or enforcing touch-up appointments
These issues are common in early practice but can be avoided through disciplined training and supervised practice. The correct mapping, a conservative approach to pigment saturation, and strict hygiene will address most common issues.
If you encounter an issue like pigment migration or excessive redness, pause the session and reassess. Often the correct response is to stop, document findings and discuss a conservative follow-up plan with the client. This keeps outcomes safe and manageable.
Aftercare, Healing & Touch-Up Protocol
Clear aftercare guidance is essential to a successful outcome. Give written instructions and verbal reinforcement so your client understands the healing phases: immediate pigment intensity, scab formation, colour settling and the eventual lightening before the touch-up.
Typical aftercare advice includes keeping the treated area clean and dry for 24–48 hours, avoiding makeup over the brows during healing, refraining from intense exercise and sauna use for at least 1–2 weeks, and applying a recommended barrier balm as instructed.
Schedule a mandatory 6–12 week touch-up to refine strokes, address any fading and ensure symmetry. Touch-ups are a normal part of the Step-by-Step Microblading Procedure — good appointment follow-through protects your reputation and client satisfaction.
- Keep the area dry for the first 24–48 hours
- Do not pick or scratch scabs — let them fall naturally
- Avoid facial treatments (chemical peels, laser) until fully healed
- Use gentle cleansers and avoid active exfoliants near the area
- Sleep on a clean pillowcase and avoid face-down sleeping
- Sun protection after healing to reduce premature fading
- Book and attend the 6–12 week follow-up touch-up
- Advise clients with active skin conditions to consult a GP first
Practical Tips for Beginners
Hands-on skill develops with repetition and reflection. Here are practical tips to accelerate learning and improve client outcomes when following a Step-by-Step Microblading Procedure.
These tips focus on small adjustments that have a large cumulative effect, from ergonomics to client communication and recording treatment details.
Implementing these daily will shorten your learning curve and boost client confidence in your service.
- Practice mapping on paper and silicone skins before live clients.
- Keep a training log with photos, pigments used and session notes.
- Work under magnification until your natural vision and coordination improve.
- Use a systematic sweep from the inner brow to the tail for consistent hair flow.
- Start clients with subtle colour and shape conservative to account for healing changes.
- Shadowing experienced artists (when available) complements online learning.
- Record your sessions (with permission) to review technique and posture.
- Seek feedback from mentors and be open to constructive criticism.
Australian Case Studies & Success Stories
Real-world learning accelerates competence. Below are anonymised case examples from Australian practitioners who followed an evidence-led Step-by-Step Microblading Procedure and achieved consistent client satisfaction.
Case Study 1: A Sydney-based artist adopted meticulous mapping and conservative pigment selection for olive-toned skin. The result was a 90% client satisfaction rate and a lower need for corrective touch-ups.
Case Study 2: A regional Queensland salon improved retention by adding clear aftercare PDFs and automated touch-up reminders, turning single treatments into returning clients for maintenance and referrals.
- Sydney practitioner: focused mapping -> improved symmetry scores in client surveys
- Brisbane artist: introduced standardised post-care emails -> reduced complications
- Melbourne trainee: extra supervised practice on silicone -> faster transition to live clients
- Adelaide technician: documented pigments and blade types -> easier troubleshooting
- Perth clinic: introduced appointment reminders -> increased touch-up attendance
- Regional presenter: community workshops -> raised local awareness and trust
- Online graduate: used before-after portfolios -> acquired new clients within weeks
- Multiple studios: adopted CPD updates -> improved compliance during inspections
Frequently Asked Questions
Answers below reflect typical beginner queries about the Step-by-Step Microblading Procedure and practical Australian context.
Is microblading painful and how can I reduce client discomfort?
Discomfort varies by client and area; using approved topical anaesthetics and applying conservative pressure reduces pain. Always follow product instructions and record dosages.
How long does a typical microblading session take for a beginner?
Beginner sessions typically run 90–150 minutes including consultation, mapping, numbing and the procedure. Allow more time initially to avoid rushing through essential steps.
What training do I need to perform microblading in Australia?
You should complete accredited training that covers infection control, pigment science and hands-on technique. Skinart Australia’s online Microblading course is CPD and BAQA aligned and designed for Australian practitioners.
Can clients with certain medical conditions get microblading?
Certain conditions are contraindications — active skin disease, pregnancy, recent isotretinoin usage, or uncontrolled diabetes may preclude treatment. Always complete a medical screen and refer uncertain cases to a GP.
How soon is a touch-up needed after the initial session?
A touch-up is commonly scheduled at 6–12 weeks to perfect colour and stroke density; this is part of the Step-by-Step Microblading Procedure and essential for a long-lasting result.
Final Thoughts & Next Steps
Mastering the Step-by-Step Microblading Procedure takes time and consistent practice. Start with a strong foundation in hygiene and mapping, be conservative with pigment and strokes, and prioritise honest client communication. Each session should be viewed as an opportunity to refine your technique and build a professional reputation.
Skinart Australia offers accredited online training, tutor feedback, and resources that align with CPD and BAQA requirements. Our course is tailored for Australian practitioners and focuses on safe, reproducible technique and professional practice management.
If you’re serious about building a skilled, compliant microblading practice in Australia, invest in accredited education and structured practice — and consider the Skinart online Microblading course to get started.
Ready to Learn the Full Procedure?
If you want a structured curriculum, practical demonstrations and recognised accreditation, our online Microblading course for Australia is designed for you.
Helpful Resources & Further Reading
For official guidance on professional development and accreditation, visit the CPD Standards Office and the Body Art Qualification Association (BAQA). These organisations outline CPD recognition and professional standards which complement your Step-by-Step Microblading Procedure training.
External links cited in this article:
Skinart Australia Microblading Course
Skinart Australia offers a fully accredited online Microblading course focused on practical technique, infection control, mapping and client care. Our course is recognised by the CPD Standards Office and BAQA and includes tutor feedback from experienced practitioners.
While we do not provide physical microblading equipment in Australia, our course prepares you to source appropriate tools safely and to adopt a professional, compliant Step-by-Step Microblading Procedure. Graduates receive certification that supports professional practice and insurance applications.
Further Reading & Industry Quotes
Industry voices emphasise the importance of accredited training and infection control. For example, the CPD Standards Office highlights that good practice includes clearly documented training outcomes and client safety procedures, while local health authorities remind practitioners to register as required and keep proper clinical records.
“Proper training, documented processes and a conservative, client-centred approach are the foundations of a safe microblading service.” — CPD Standards Office (summary)
Recent Blog Posts
- 🌙 Eid Mubarak: Celebrate with 5% Off in 2026!
 Eid Savings: 5% Off All Courses Celebrate Eid with a special offer: 5% off any course. Use code EID5 at checkout.… Read More »🌙 Eid Mubarak: Celebrate with 5% Off in 2026!
 - Top Mistakes New Body Artists Should Avoid (2026)
 Stay Ahead: Common Pitfalls for New Artists Read up on the most frequent errors new body artists make, and how to… Read More »Top Mistakes New Body Artists Should Avoid (2026)
 - Client Communication Skills: 2026 Body Art Success
 Master Consultation for Better Results Top communication strategies for client satisfaction and better outcomes in 2026 and beyond. X Send Chat