Tattoo Removal Healing Timeline and Aftercare Tips
Understanding the Tattoo Removal Healing Timeline is essential whether you’re planning removal for cosmetic reasons or expanding your professional practice in Australia. This guide explains what to expect after an ink rejection tattoo removal treatment — the method we teach at Skinart Australia — and gives practical aftercare tips to promote optimal healing and minimise complications.
The Tattoo Removal Healing Timeline depends on multiple factors: ink age, colour, skin type, the chosen removal technique, and how closely aftercare instructions are followed. In Australia we see a wide range of outcomes due to diverse skin types and climate conditions; this article will walk you through a realistic timeline, common issues, and clear aftercare steps tailored to Australian students and clients.
Written by Gary, 25 years in Tattoo Removal education — this resource draws on experience training practitioners across Australia, real client case studies, and best-practice clinical advice so you can approach removal with confidence.
Table of Contents
- What is ink-rejection removal and healing timeline?
- Immediate care: 0–48 hours
- First week: 3–14 days
- Weeks 2–12: expected changes
- Common mistakes that delay healing
- Aftercare essentials and recommended products
- Managing complications and when to see a doctor
- How many sessions and what to expect long term
- FAQ — Tattoo Removal Healing Timeline
- Final thoughts & next steps
Tip: Use these anchor links to quickly jump to any section — Google may show “Jump to” links for these headings in search results.
What is ink-rejection removal and the healing timeline?
Tattoo removal via the ink-rejection method — the approach we teach on our Tattoo Removal course — involves introducing a removal solution into the dermis that encourages skin to reject and expel pigment. Unlike laser that fragments ink with heat, ink-rejection is mechanical and biological: the solution binds pigment particles and stimulates a controlled inflammatory response to eject ink. Understanding the Tattoo Removal Healing Timeline for this method helps practitioners plan realistic sessions and advise clients accurately.
Healing progresses through predictable stages: an immediate inflammatory reaction, crusting and scabbing, a phase where pigment lifts and fades, then remodelling and maturation of the skin. How fast each stage happens depends on tattoo characteristics (age, ink type, density, and colour), client health, and aftercare. For many Australian clients we see visible lightening within 2–6 weeks, with full remodelling continuing for months.
While the Tattoo Removal Healing Timeline shares similarities with surgical or laser wound healing, the ink-rejection method generally requires fewer sessions and often shows improved results on bright colours. As a certified Skinart Australia practitioner you’ll learn how to set expectations, document progress, and manage tissue so that the process is safe and effective.
Immediate care: 0–48 hours
In the first two days after an ink-rejection session, the skin’s priority is to manage inflammation and prevent infection. Clients will commonly experience redness, swelling, mild heat, and fluid exudate. This is a normal part of the Tattoo Removal Healing Timeline.
- Pros: Rapid pigment lift, fewer sessions than laser for many colours.
- Cons: Visible crusting and temporary tenderness; strict aftercare required to avoid scarring.
Advise clients to keep the treated area clean and lightly covered for the first 24 hours, avoid hot showers or soaking, and to follow your clinic’s dressing protocol. In Australia’s climate, perspiration can increase infection risk, so clients should avoid heavy exercise and swimming pools during this immediate phase.
Document the immediate reaction with photographs and provide written aftercare instructions — these are vital for remote clients in Australia who may not return to the clinic quickly. Early follow-up (24–72 hours by message/photo) helps catch early complications and reassures the client during the critical initial steps of the Tattoo Removal Healing Timeline.
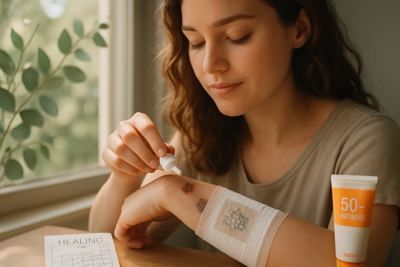
First week: 3–14 days
Between days three and fourteen the skin forms crusts and scabs as excess fluid is reabsorbed and the removal solution carries pigment toward the surface. This stage is often the most visible part of the Tattoo Removal Healing Timeline; patients commonly ask whether scabbing indicates infection. In most cases, carefully managed scabbing is expected.
Clients should not pick, scratch, or prematurely remove scabs. Interfering with scabs is the most common cause of post-removal scarring. Keep the area moisturised with the product you recommend and ensure clothing does not rub the treatment site.
During the first two weeks you’ll usually see a reduction in pigment intensity as the crusts slough away and underlying tissue reveals a paler appearance. The Tattoo Removal Healing Timeline here is variable — expect pigment to be lighter but not fully gone; repeat sessions are scheduled based on observed fade and tissue condition.
- Keep the area dry for the first 24 hours, then gently clean twice daily.
- Avoid chlorinated pools and open water until scabs have fallen off.
- Use a non-fragranced, hypoallergenic moisturiser recommended by your practitioner.
- Avoid sun exposure; UV light can darken residual pigment and complicate healing.
- Wear loose, breathable clothing to minimise friction.
- If dressing is used, change dressings with clean hands and sterile technique.
- Do not apply topical antibiotics unless instructed — overuse can cause contact reactions.
- Photograph the site every few days to track progress and share with your practitioner.
Weeks 2–12 and expected changes
- Persistent pigment may continue to fade progressively.
- Skin texture may look slightly different (pink or paler) as remodelling occurs.
- Sensation should normalise (reduced tenderness and heat).
- Hypopigmentation or hyperpigmentation can appear in some skin types.
- Clients with darker Fitzpatrick skin types require careful monitoring for pigment changes.
- Sun avoidance remains crucial to prevent contrast between treated and untreated skin.
- Scheduling of further sessions depends on tissue recovery and clinical evaluation.
- Scarring is uncommon when proper technique and aftercare are used but must be monitored.
During weeks 2–12 the skin remodels and the immune system clears residual pigment. You’ll often see continued improvement between sessions; advise clients that visible fading can continue for months after a treatment. In Australia’s summer months, UV protection is an important factor in achieving even results and preventing long-term pigment changes.
Always use clinical photographs to compare sessions; this supports professional assessments and helps determine safe intervals between treatments. For most clients we recommend waiting a minimum of 6–8 weeks between ink-rejection sessions to allow tissue to fully repair and to evaluate true pigment retention.
Common mistakes that delay healing
Many setbacks in the Tattoo Removal Healing Timeline are avoidable. Below are common errors both clients and inexperienced practitioners make, followed by concise remedial advice.
- Picking or peeling scabs — increases scarring risk.
- Applying harsh antiseptics or undiluted solutions — causes tissue irritation.
- Using fragranced creams or oils — can cause contact dermatitis.
- Returning to swimming pools, spas, or ocean too early — raises infection risk.
- Poorly documented baseline photos — makes progress tracking unreliable.
- Scheduling sessions too soon — risks cumulative tissue damage.
- Not advising sun avoidance — UV can darken residual pigment.
- Inadequate wound checks for high-risk clients (e.g., diabetics) — delays recognition of complications.
When teaching students on our Tattoo Removal course we emphasise the importance of client education and documentation. Clear aftercare instructions and a structured follow-up schedule are as important as technique when it comes to the Tattoo Removal Healing Timeline and patient satisfaction.
Correcting these mistakes usually involves patient re-education, topical emollients for damaged skin, and, if necessary, early medical review. For Australian clients in remote areas, telehealth photo check-ins are an effective tool to keep healing on track.
Aftercare essentials and recommended products
Proper aftercare supports each phase of the Tattoo Removal Healing Timeline. As a practitioner you should provide clients with a concise checklist and product recommendations that are readily available in Australia.
We don’t supply equipment in Australia, and students should be clear about that when quoting clients. Instead, focus on evidence-based aftercare: sterile dressings, non-adherent pads, gentle cleansers, and emollients that reduce transepidermal water loss (TEWL).
Here are practical items to recommend to Australian clients — choose pharmacy-grade or dermatologist-approved options:
- Sterile saline or cooled boiled water (cooled) for initial cleansing.
- Non-adherent wound dressing (e.g., silicone contact layer) for first 24–48 hours.
- Hypoallergenic emollient (petrolatum-free where possible) to keep skin supple.
- A fragrance-free, low-sensitising moisturiser for ongoing skin care.
- Broad-spectrum sunscreen SPF 50+ once the skin has closed (usually after scabs fall).
- Loose, breathable clothing to avoid friction.
- Cool compress instructions for managing swelling (not ice directly on the skin).
- Clear written instructions and photo guidance for remote follow-up.
Managing complications and when to seek medical help
Most treatments follow a straightforward Tattoo Removal Healing Timeline, but complications can occur. The most common are infection, allergic reactions, and atypical pigmentation changes. As the practitioner, your role is early recognition and appropriate referral.
Signs that require urgent medical review include spreading redness beyond the treatment area, increasing pain, fever, purulent discharge, or systemic symptoms. For allergic-type reactions (intense itching, widespread rash), advise clients to seek medical review promptly.
When in doubt, escalate: document symptoms, request photos, and if infection is suspected recommend a GP or emergency care. In Australia, medicolegal expectations are clear: maintain records and advise clients to seek immediate care for systemic signs. A municipal health spokesperson quoted in a local council awareness bulletin observed, “Early identification of infection reduces complications and protects both client and provider.”
How many sessions and what to expect long term
One of the most asked questions is “How many sessions will I need?” For the ink-rejection method, many clients require fewer sessions than laser for multi-coloured work. However, the Tattoo Removal Healing Timeline is cumulative — each session needs time to resolve before the next. Typical ranges are 2–6 sessions for many tattoos, but dense or heavily saturated work may take more.
Spacing sessions at 6–12 week intervals is common to allow for full tissue recovery and objective assessment. Document progress with standardised photography and chart pigment density to make evidence-based decisions about further treatment.
Long-term results also depend on client factors: sun exposure, smoking, and skin health all influence remodelling. In our Australian case series, clients who followed strict aftercare and sun protection achieved the best long-term outcomes with minimal scarring.
FAQ — Tattoo Removal Healing Timeline
Q: How long does it take to see results after a removal session?
A: You can expect visible lightening within 2–6 weeks, although pigment remodelling may continue for several months. The Tattoo Removal Healing Timeline varies by tattoo and skin factors.
Q: When can I have another removal session?
A: Wait at least 6–8 weeks between sessions to allow the skin to repair and for true pigment retention to be assessed. Sometimes longer intervals are recommended for sensitive or slower-healing clients.
Q: Will removal leave a scar?
A: Scarring is uncommon with proper technique and aftercare, but it can occur if scabs are picked, infections occur, or sessions are spaced too closely. Our training covers strategies to minimise scarring throughout the Tattoo Removal Healing Timeline.
Q: Can all colours be removed with ink-rejection?
A: Ink-rejection targets a broad range of colours; many clients see fewer sessions compared with laser. Some stubborn inks may still need additional treatments, but overall the method is effective across most palettes.
Q: How should I protect my treated skin from the sun?
A: Avoid direct sun during the active healing phase and once the skin is healed apply broad-spectrum SPF 50+ daily. Sun exposure can cause uneven pigmentation and affect healing for months after treatment.
Q: Is aftercare different for sensitive skin or darker skin types?
A: Yes. Darker skin types should be monitored closely for hyper- or hypopigmentation, and gentle, conservative treatment intervals are advised. Our courses cover tailored aftercare and risk management for diverse skin types common across Australia.
Q: When should I seek medical help?
A: Seek medical review if you notice spreading redness, increased pain, fever, heavy pus, or any systemic symptoms. Early treatment of infection prevents long-term problems and protects both you and your practitioner.
Final thoughts and next steps
The Tattoo Removal Healing Timeline can feel daunting for clients, but with structured aftercare and clear communication you can guide them safely through every phase. As a practitioner, your role is to set realistic expectations, manage tissue wisely, and follow a documented aftercare pathway.
At Skinart Australia we teach the ink-rejection removal method that targets multiple colours with fewer sessions and less scarring risk compared to many alternatives. Our online Tattoo Removal course covers technique, client selection, consent, and detailed aftercare so you can practise confidently — even remotely across Australia.
If you’re ready to deepen your knowledge of the Tattoo Removal Healing Timeline, prevention of complications, and practical aftercare protocols tailored to Australian clients, take the next step below. Our course is fully accredited with the CPD Standards Office and BAQA, taught by Gary with over 25 years’ experience.
Ready to learn professional tattoo removal?
Recent Blog Posts
- 🌙 Eid Mubarak: Celebrate with 5% Off in 2026!
 Eid Savings: 5% Off All Courses Celebrate Eid with a special offer: 5% off any course. Use code EID5 at checkout.… Read More »🌙 Eid Mubarak: Celebrate with 5% Off in 2026!
 - Top Mistakes New Body Artists Should Avoid (2026)
 Stay Ahead: Common Pitfalls for New Artists Read up on the most frequent errors new body artists make, and how to… Read More »Top Mistakes New Body Artists Should Avoid (2026)
 - Client Communication Skills: 2026 Body Art Success
 Master Consultation for Better Results Top communication strategies for client satisfaction and better outcomes in 2026 and beyond. X Send Chat